(Adding old home knowledge) |
No edit summary Tag: Source edit |
||
| (9 intermediate revisions by 4 users not shown) | |||
| Line 24: | Line 24: | ||
| style="border-color:white;width:150px;"|'''A Drizzly Coward''' |
| style="border-color:white;width:150px;"|'''A Drizzly Coward''' |
||
| style="border-color:white;text-align:center;"|[[File:Crazy_old_wizard_clue.png|center]] |
| style="border-color:white;text-align:center;"|[[File:Crazy_old_wizard_clue.png|center]] |
||
| − | | style="border-color:white;text-align:center;"|The Crazy Old Wizard can be found |
+ | | style="border-color:white;text-align:center;"|The Crazy Old Wizard can be found on the east wall of the ::home Bank. |
|- |
|- |
||
| style="border-color:white;width:150px;"|'''LimeStone''' |
| style="border-color:white;width:150px;"|'''LimeStone''' |
||
| style="border-color:white;text-align:center;"|[[File:Milestone_clue.png|center]] |
| style="border-color:white;text-align:center;"|[[File:Milestone_clue.png|center]] |
||
| − | | style="border-color:white;text-align:center;"|MileStone can be |
+ | | style="border-color:white;text-align:center;"|MileStone can be at '''::Shops'''. |
|- |
|- |
||
| style="border-color:white;width:150px;"|'''Kid Mom''' |
| style="border-color:white;width:150px;"|'''Kid Mom''' |
||
| style="border-color:white;text-align:center;"|[[File:Dommik_clue.png|center]] |
| style="border-color:white;text-align:center;"|[[File:Dommik_clue.png|center]] |
||
| − | | style="border-color:white;text-align:center;"| |
+ | | style="border-color:white;text-align:center;"|Skills interface - Summoning - Teleport |
|- |
|- |
||
| style="border-color:white;width:150px;"|'''Ref Ram''' |
| style="border-color:white;width:150px;"|'''Ref Ram''' |
||
| style="border-color:white;text-align:center;"|[[File:Farmer_clue.png|center]] |
| style="border-color:white;text-align:center;"|[[File:Farmer_clue.png|center]] |
||
| − | | style="border-color:white;text-align:center;"| |
+ | | style="border-color:white;text-align:center;"|Skills interface - Farming - Teleport |
|- |
|- |
||
| style="border-color:white;width:150px;"|'''Limbered Ionsas''' |
| style="border-color:white;width:150px;"|'''Limbered Ionsas''' |
||
| style="border-color:white;text-align:center;"|[[File:Miniboss_leader_clue.png|center]] |
| style="border-color:white;text-align:center;"|[[File:Miniboss_leader_clue.png|center]] |
||
| − | | style="border-color:white;text-align:center;"| |
+ | | style="border-color:white;text-align:center;"|The Miniboss Leader can be found at ::shops. |
|- |
|- |
||
| style="border-color:white;width:150px;"|'''Raving Pickle''' |
| style="border-color:white;width:150px;"|'''Raving Pickle''' |
||
| style="border-color:white;text-align:center;"|[[File:King_Percival_clue.png|center]] |
| style="border-color:white;text-align:center;"|[[File:King_Percival_clue.png|center]] |
||
| − | | style="border-color:white;text-align:center;"| |
+ | | style="border-color:white;text-align:center;"|King Percival Can be found at ::shops. |
|- |
|- |
||
| style="border-color:white;width:150px;"|'''U May At''' |
| style="border-color:white;width:150px;"|'''U May At''' |
||
| style="border-color:white;text-align:center;"|[[File:Tamayu_clue.png|center]] |
| style="border-color:white;text-align:center;"|[[File:Tamayu_clue.png|center]] |
||
| − | | style="border-color:white;text-align:center;"| |
+ | | style="border-color:white;text-align:center;"|Skills interface - Hunter - Teleport |
|- |
|- |
||
| style="border-color:white;width:150px;"|'''Finer Mash''' |
| style="border-color:white;width:150px;"|'''Finer Mash''' |
||
| style="border-color:white;text-align:center;"|[[File:Fisherman_clue.png|center]] |
| style="border-color:white;text-align:center;"|[[File:Fisherman_clue.png|center]] |
||
| − | | style="border-color:white;text-align:center;"| |
+ | | style="border-color:white;text-align:center;"|Skills interface - Fishing - Teleport |
|- |
|- |
||
| style="border-color:white;width:150px;"|'''Ark Aid''' |
| style="border-color:white;width:150px;"|'''Ark Aid''' |
||
| Line 60: | Line 60: | ||
| style="border-color:white;width:150px;"|'''Not Aids''' |
| style="border-color:white;width:150px;"|'''Not Aids''' |
||
| style="border-color:white;text-align:center;"|[[File:Notsaid_clue.png|center]] |
| style="border-color:white;text-align:center;"|[[File:Notsaid_clue.png|center]] |
||
| − | | style="border-color:white;text-align:center;"|City Teleports - Canifis |
+ | | style="border-color:white;text-align:center;"|City Teleports - Canifis |
|- |
|- |
||
| style="border-color:white;width:150px;"|'''He Cocktail Hero''' |
| style="border-color:white;width:150px;"|'''He Cocktail Hero''' |
||
| style="border-color:white;text-align:center;"|[[File:Charlie_the_cook_clue.png|center]] |
| style="border-color:white;text-align:center;"|[[File:Charlie_the_cook_clue.png|center]] |
||
| − | | style="border-color:white;text-align:center;"| |
+ | | style="border-color:white;text-align:center;"|Skills interface - Cooking - Teleport |
|- |
|- |
||
| style="border-color:white;width:150px;"|'''Scroll Hi Go''' |
| style="border-color:white;width:150px;"|'''Scroll Hi Go''' |
||
| Line 72: | Line 72: | ||
| style="border-color:white;width:150px;"|'''Beheld Rare''' |
| style="border-color:white;width:150px;"|'''Beheld Rare''' |
||
| style="border-color:white;text-align:center;"|[[File:Herb_dealer_clue.png|center]] |
| style="border-color:white;text-align:center;"|[[File:Herb_dealer_clue.png|center]] |
||
| − | | style="border-color:white;text-align:center;"| |
+ | | style="border-color:white;text-align:center;"|Skills interface - Herblore - Teleport |
|- |
|- |
||
| style="border-color:white;width:150px;"|'''Seagulls or Lad''' |
| style="border-color:white;width:150px;"|'''Seagulls or Lad''' |
||
| style="border-color:white;text-align:center;"|[[File:Solus_Dellagar_clue.png|center]] |
| style="border-color:white;text-align:center;"|[[File:Solus_Dellagar_clue.png|center]] |
||
| − | | style="border-color:white;text-align:center;"| |
+ | | style="border-color:white;text-align:center;"|Teleport to ::skilling and run west to the ladder, then kill Solus Dellagar. |
|- |
|- |
||
| style="border-color:white;width:150px;"|'''Minosah''' |
| style="border-color:white;width:150px;"|'''Minosah''' |
||
| style="border-color:white;text-align:center;"|[[File:Shanomi_clue.png|center]] |
| style="border-color:white;text-align:center;"|[[File:Shanomi_clue.png|center]] |
||
| − | | style="border-color:white;text-align:center;"| |
+ | | style="border-color:white;text-align:center;"|This clue is currently broken. |
|- |
|- |
||
| style="border-color:white;width:150px;"|'''Ilae Kdly''' |
| style="border-color:white;width:150px;"|'''Ilae Kdly''' |
||
| Line 105: | Line 105: | ||
| style="text-align:center;border-color:white;"|'''Dig in front of the Staircase, North of the Fishermen's Town.''' |
| style="text-align:center;border-color:white;"|'''Dig in front of the Staircase, North of the Fishermen's Town.''' |
||
| style="text-align:center;border-color:white;"| |
| style="text-align:center;border-color:white;"| |
||
| − | + | City Teleports -> Catherby -> Run North |
|
| style="border-color:white;text-align:center;"|[[File:Xvzp7fm.png|center|314px]] |
| style="border-color:white;text-align:center;"|[[File:Xvzp7fm.png|center|314px]] |
||
|- |
|- |
||
| style="text-align:center;border-color:white;"|'''Dig in the Middle of Seer's Village Flax Field.''' |
| style="text-align:center;border-color:white;"|'''Dig in the Middle of Seer's Village Flax Field.''' |
||
| − | | style="border-color:white;text-align:center;"| |
+ | | style="border-color:white;text-align:center;"|Type ::WC then run South East. |
| style="border-color:white;text-align:center;"|[[File:PdMM0al.png|center|314px]] |
| style="border-color:white;text-align:center;"|[[File:PdMM0al.png|center|314px]] |
||
|- |
|- |
||
| style="border-color:white;text-align:center;"|'''On Port-Sarim's most Southern Penninsula, dig behind the tree.''' |
| style="border-color:white;text-align:center;"|'''On Port-Sarim's most Southern Penninsula, dig behind the tree.''' |
||
| − | | style="border-color:white;text-align:center;"|City Teleports - Port Sarim, then run south to the |
+ | | style="border-color:white;text-align:center;"|City Teleports - Port Sarim, then run south to the peninsula. |
| style="border-color:white;text-align:center;"|[[File:Penn.png|center|302px]] |
| style="border-color:white;text-align:center;"|[[File:Penn.png|center|302px]] |
||
|- |
|- |
||
| Line 121: | Line 121: | ||
|- |
|- |
||
| style="border-color:white;text-align:center;"|'''There where the Northeners live, dig amidst the stall area.''' |
| style="border-color:white;text-align:center;"|'''There where the Northeners live, dig amidst the stall area.''' |
||
| − | | style="border-color:white;text-align:center;"| |
+ | | style="border-color:white;text-align:center;"|City Teleports - Seers Village - Follow the Road to the North East to Relleka. |
| style="border-color:white;text-align:center;"|[[File:CKG0Gpp.png|center|314px]] |
| style="border-color:white;text-align:center;"|[[File:CKG0Gpp.png|center|314px]] |
||
|- |
|- |
||
| Line 137: | Line 137: | ||
|- |
|- |
||
| style="border-color:white;text-align:center;"|'''Dig at the Tree of Thugs.''' |
| style="border-color:white;text-align:center;"|'''Dig at the Tree of Thugs.''' |
||
| − | | style="border-color:white;text-align:center;"| |
+ | | style="border-color:white;text-align:center;"|This clue is currently broken. |
| style="border-color:white;text-align:center;"|[[File:7FyESh1.png|center|314px]] |
| style="border-color:white;text-align:center;"|[[File:7FyESh1.png|center|314px]] |
||
|- |
|- |
||
| Line 145: | Line 145: | ||
|- |
|- |
||
| style="border-color:white;text-align:center;"|'''Dig in front of the Cave, where the Big Kahuna lives.''' |
| style="border-color:white;text-align:center;"|'''Dig in front of the Cave, where the Big Kahuna lives.''' |
||
| − | | style="border-color:white;text-align:center;"| |
+ | | style="border-color:white;text-align:center;"|This clue is currently broken. |
| style="border-color:white;text-align:center;"|[[File:VHDgpIH.png|center|314px]] |
| style="border-color:white;text-align:center;"|[[File:VHDgpIH.png|center|314px]] |
||
|- |
|- |
||
| Line 165: | Line 165: | ||
|- |
|- |
||
| style="border-color:white;text-align:center;"|'''Dig in front of the blessed altar, where duels are held.''' |
| style="border-color:white;text-align:center;"|'''Dig in front of the blessed altar, where duels are held.''' |
||
| − | | style="border-color:white;text-align:center;"| |
+ | | style="border-color:white;text-align:center;"|This clue is currently broken. |
| style="border-color:white;text-align:center;"|[[File:Clue_scorll.png|center|243px]] |
| style="border-color:white;text-align:center;"|[[File:Clue_scorll.png|center|243px]] |
||
|- |
|- |
||
| Line 244: | Line 244: | ||
|- |
|- |
||
| style="border-color:white;width:150px;text-align:center;"|'''Search the Crate in the house at the Guild of Fishers.''' |
| style="border-color:white;width:150px;text-align:center;"|'''Search the Crate in the house at the Guild of Fishers.''' |
||
| − | | style="border-color:white;width:200px;text-align:center;" | |
+ | | style="border-color:white;width:200px;text-align:center;" |This clue is currently broken. |
| style="border-color:white;text-align:center;"|[[File:Fishing_guild_crate.png|center|314px]] |
| style="border-color:white;text-align:center;"|[[File:Fishing_guild_crate.png|center|314px]] |
||
|- |
|- |
||
| Line 252: | Line 252: | ||
|- |
|- |
||
| style="border-color:white;width:150px;text-align:center;"|'''Search the Memorial close to a Waterpump, Somewhere in the Marsh.''' |
| style="border-color:white;width:150px;text-align:center;"|'''Search the Memorial close to a Waterpump, Somewhere in the Marsh.''' |
||
| − | | style="border-color:white;width:200px;text-align:center;"| |
+ | | style="border-color:white;width:200px;text-align:center;"|Monster Teleports - Mage gray, then run west past the farming spot. |
| style="border-color:white;text-align:center;"|[[File:Canifis_tombstone.png|center|314px]][[File:Canifis_tombstone_2.png|center|314px]] |
| style="border-color:white;text-align:center;"|[[File:Canifis_tombstone.png|center|314px]][[File:Canifis_tombstone_2.png|center|314px]] |
||
|- |
|- |
||
| style="border-color:white;width:150px;text-align:center;"|'''Search the Chest on the Abandoned Ship.''' |
| style="border-color:white;width:150px;text-align:center;"|'''Search the Chest on the Abandoned Ship.''' |
||
| − | | style="border-color:white;width:200px;text-align:center;"| |
+ | | style="border-color:white;width:200px;text-align:center;"|Monster teleports - Mage Gray, then run west until you see the ship to the north. |
| style="border-color:white;text-align:center;"|[[File:Abandoned_ship_crate_2.png|center|314px]] |
| style="border-color:white;text-align:center;"|[[File:Abandoned_ship_crate_2.png|center|314px]] |
||
|- |
|- |
||
| Line 284: | Line 284: | ||
|- |
|- |
||
| style="border-color:white;width:150px;text-align:center;"|'''Inspect the farming patch''' |
| style="border-color:white;width:150px;text-align:center;"|'''Inspect the farming patch''' |
||
| − | | style="border-color:white;width:200px;text-align:center;"| |
+ | | style="border-color:white;width:200px;text-align:center;"|City Teleports -> Catherby -> Run north to the farming patch. |
| style="border-color:white;text-align:center;"|[[File:Farmingp_patch.png|center|314px]] |
| style="border-color:white;text-align:center;"|[[File:Farmingp_patch.png|center|314px]] |
||
|} |
|} |
||
| Line 296: | Line 296: | ||
| style="text-align:center;border-color:white;width:150px;"| |
| style="text-align:center;border-color:white;width:150px;"| |
||
'''Equip a pair of iron platelegs, dagger, and a monkey lover.''' |
'''Equip a pair of iron platelegs, dagger, and a monkey lover.''' |
||
| − | | style="text-align:center;border-color:white;"| |
+ | | style="text-align:center;border-color:white;"|::flameking - Flame Torva |
| style="border-color:white;text-align:center;"|[[File:BUgMSF3.png|center|314px]] |
| style="border-color:white;text-align:center;"|[[File:BUgMSF3.png|center|314px]] |
||
|- |
|- |
||
| Line 318: | Line 318: | ||
|- |
|- |
||
| style="text-align:center;border-color:white;"|'''Equip a Glock, Vanguard Gloves, and Karil’s Skirt, and Jig inbetween the torches at the Ardougne Magic Trees.''' |
| style="text-align:center;border-color:white;"|'''Equip a Glock, Vanguard Gloves, and Karil’s Skirt, and Jig inbetween the torches at the Ardougne Magic Trees.''' |
||
| − | | style="text-align:center;border-color:white;" | |
+ | | style="text-align:center;border-color:white;" |Type ::WC, then run South to the house with the Magic Trees. |
| style="border-color:white;text-align:center;"|[[File:DJR21tD.png|center|314px]] |
| style="border-color:white;text-align:center;"|[[File:DJR21tD.png|center|314px]] |
||
|- |
|- |
||
| style="text-align:center;border-color:white;"|'''Equip a pair of Barrow Gloves, an Elemental Whip, and a Drygore Offhand. Bow to the one who has no arms.''' |
| style="text-align:center;border-color:white;"|'''Equip a pair of Barrow Gloves, an Elemental Whip, and a Drygore Offhand. Bow to the one who has no arms.''' |
||
| − | | style="text-align:center;border-color:white;"|Wear the Items and |
+ | | style="text-align:center;border-color:white;"|Wear the Items and Bow in front of iron man at ::shops |
| − | | style="border-color:white;text-align:center;"|[[File: |
+ | | style="border-color:white;text-align:center;"|[[File:IronManClueStep.png|center|314px]] |
|- |
|- |
||
| style="text-align:center;border-color:white;"|'''Equip a pair of pirate boots, gilded platebody, gnome scarf and a brutal whip and dance right next to the range at the smithing teleport.''' |
| style="text-align:center;border-color:white;"|'''Equip a pair of pirate boots, gilded platebody, gnome scarf and a brutal whip and dance right next to the range at the smithing teleport.''' |
||
| − | | style="text-align:center;border-color:white;"| |
+ | | style="text-align:center;border-color:white;"|Deceptive Clue, actual location is City Teleports -> Catherby -> Run East |
| style="border-color:white;text-align:center;"|[[File:MRGBcvH.png|center|314px]] |
| style="border-color:white;text-align:center;"|[[File:MRGBcvH.png|center|314px]] |
||
|- |
|- |
||
| style="text-align:center;border-color:white;"|'''Equip a Royal Sicle, a Rainbow Cape and nothing else.''' |
| style="text-align:center;border-color:white;"|'''Equip a Royal Sicle, a Rainbow Cape and nothing else.''' |
||
'''Goblin Salute to the hidden wall at Dreamscape’s hottest place.''' |
'''Goblin Salute to the hidden wall at Dreamscape’s hottest place.''' |
||
| − | | style="text-align:center;border-color:white;"| |
+ | | style="text-align:center;border-color:white;"|Type ::flameking - Flame Pernix, then run north to the hidden wall. BE SURE TO USE GOBLIN SALUTE. |
| style="border-color:white;text-align:center;"|[[File:OCdELlC.png|center|314px]] |
| style="border-color:white;text-align:center;"|[[File:OCdELlC.png|center|314px]] |
||
|- |
|- |
||
| Line 352: | Line 352: | ||
| style="text-align:center;border-color:white;"|'''Equip an Assault Rifle, a Gold Chain, and a pair of Steadfast Boots.''' |
| style="text-align:center;border-color:white;"|'''Equip an Assault Rifle, a Gold Chain, and a pair of Steadfast Boots.''' |
||
'''Dance in front of Spectral Wall there where the Mage lives.''' |
'''Dance in front of Spectral Wall there where the Mage lives.''' |
||
| − | | style="text-align:center;border-color:white;"| |
+ | | style="text-align:center;border-color:white;"|Monster Teleports - Mage Gray, then run south to the gate. |
| style="border-color:white;text-align:center;"|[[File:LXTccMB.png|center|314px]] |
| style="border-color:white;text-align:center;"|[[File:LXTccMB.png|center|314px]] |
||
|- |
|- |
||
| style="text-align:center;border-color:white;"|'''Equip an Katana of stars, Vet’ion pet and a pair of White glass wings and do the zombie dance in-between the 2 statues in front of the Slayer tower.''' |
| style="text-align:center;border-color:white;"|'''Equip an Katana of stars, Vet’ion pet and a pair of White glass wings and do the zombie dance in-between the 2 statues in front of the Slayer tower.''' |
||
| − | | style="text-align:center;border-color:white;"| |
+ | | style="text-align:center;border-color:white;"|City Teleports - Canifis - Run North West to the Slayer Tower. |
| style="border-color:white;text-align:center;"|[[File:OKqc2RG.png|center|314px]] |
| style="border-color:white;text-align:center;"|[[File:OKqc2RG.png|center|314px]] |
||
|} |
|} |
||
| Line 491: | Line 491: | ||
|- |
|- |
||
! scope="col" style="border-color:white;text-align:center;"| |
! scope="col" style="border-color:white;text-align:center;"| |
||
| − | [[File: |
+ | [[File:Clue Scroll Rewards.png|center|600x600px]] |
</tabber></center> |
</tabber></center> |
||
[[Category:Clue Scroll]] |
[[Category:Clue Scroll]] |
||
Revision as of 00:41, 9 May 2021

This guide will be FULL of what you will expect to find while hunting for guides! Such as what bosses to kill, where to find the clue scroll area, and what items you need to equip. Please use
Clue Scroll Levels: In total we have 4 levels of clues:
- Normal (3)
- Hard (5)
- Elite (8)
- Dream (15)
| Hint | NPC (Image) | Location |
|---|---|---|
| A Drizzly Coward |  |
The Crazy Old Wizard can be found on the east wall of the ::home Bank. |
| LimeStone |  |
MileStone can be at ::Shops. |
| Kid Mom |  |
Skills interface - Summoning - Teleport |
| Ref Ram |  |
Skills interface - Farming - Teleport |
| Limbered Ionsas |  |
The Miniboss Leader can be found at ::shops. |
| Raving Pickle |  |
King Percival Can be found at ::shops. |
| U May At | 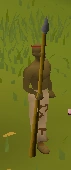 |
Skills interface - Hunter - Teleport |
| Finer Mash |  |
Skills interface - Fishing - Teleport |
| Ark Aid |  |
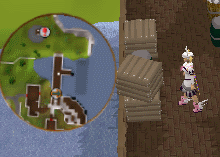
Type ::edge. Kardia |
| Not Aids |  |
City Teleports - Canifis |
| He Cocktail Hero |  |
Skills interface - Cooking - Teleport |
| Scroll Hi Go |  |
Type ::edge and run south. Schoolgirl. |
| Beheld Rare |  |
Skills interface - Herblore - Teleport |
| Seagulls or Lad |  |
Teleport to ::skilling and run west to the ladder, then kill Solus Dellagar. |
| Minosah |  |
This clue is currently broken. |
| Ilae Kdly |   |
City Teleports - Varrock. Lady Keli |
| Hint | Location | Correct Digsite |
|---|---|---|
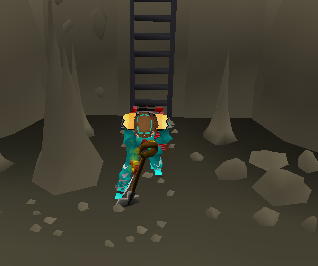
| Within the worm filled cave dig in front of the way up . |
Monster Teleports - Strykewyrm, then run south to the ladder. |
 |
| Dig in Front of the Jail in Seers' village village. | City Teleports - Seers Village, then run west to the jail cells. | 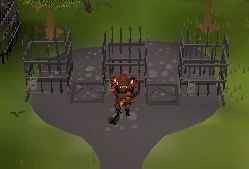 |
| Dig in front of the Staircase, North of the Fishermen's Town. |
City Teleports -> Catherby -> Run North |
 |
| Dig in the Middle of Seer's Village Flax Field. | Type ::WC then run South East. | 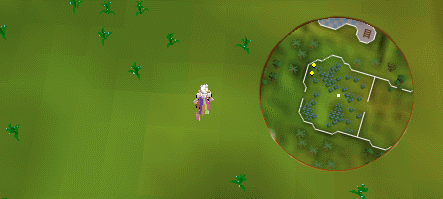 |
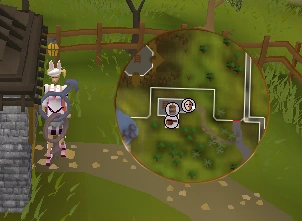
| On Port-Sarim's most Southern Penninsula, dig behind the tree. | City Teleports - Port Sarim, then run south to the peninsula. | 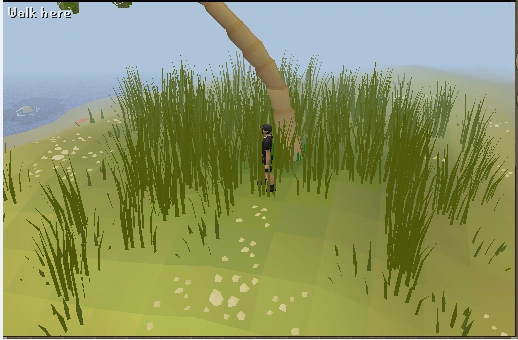 |
| Dig in front of the GraveStone, at Port-Sarim's Graveyard. | City Teleports - Port Sarim, then run south to the graveyard. | 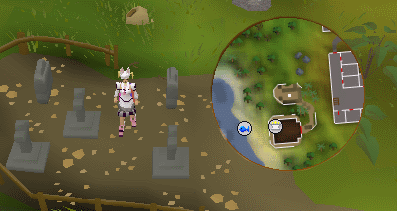 |
| There where the Northeners live, dig amidst the stall area. | City Teleports - Seers Village - Follow the Road to the North East to Relleka. | 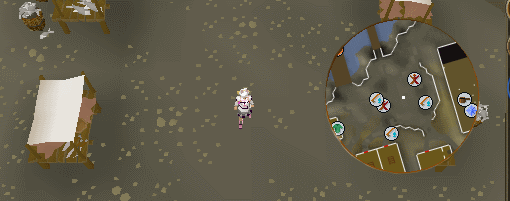 |
| Dig where the Troll dwell and humans boil. | City Teleports - Burthorpe, then run northwest through the death plateau to reach the cooking pot. |  |
| Dig in front of the Cooking Guild. | City Teleports - Varrock, then run west and a bit north to reach the cooking guild. | 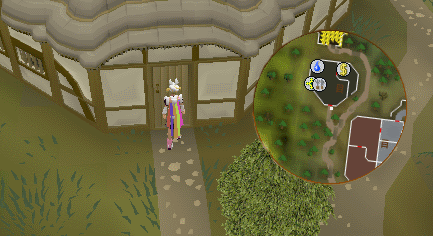 |
| Dig in the Middle of Lumbridge's Graveyard. | City Teleports - Lumbridge, then run south west to the graveyard. | 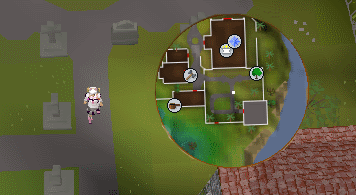 |
| Dig at the Tree of Thugs. | This clue is currently broken. | 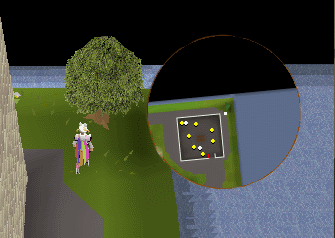 |
| Dig in front of the gate, at the City of Magic. | City Teleports- Yanille, then run west to the gate. | 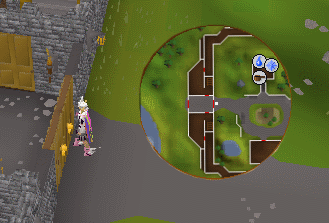 |
| Dig in front of the Cave, where the Big Kahuna lives. | This clue is currently broken. | 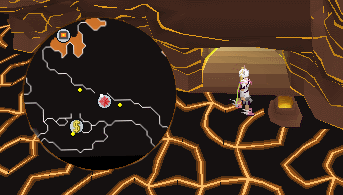 |
| Dig in front of the House at the Desolate Island. | City Teleports - Yanille, run north east out of the gate, east to the ocean then south until you reach a bridge. Cross the bridge and follow the path to the house. | 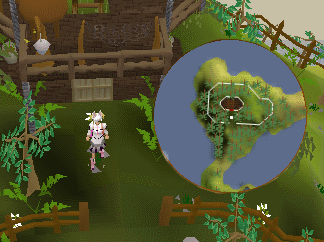 |
| Amidst the Marsh, dig in front of the Wooden Grave. | City Teleports - Canifis, then run all the way to the East until you run into a stream of Water | 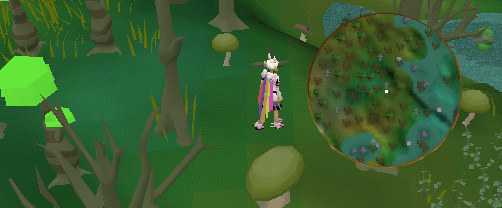 |
| Dig under the Charma at Draynor Village. | City Teleports - Draynor Village. Dig Underneath the window behind the bench in the market to the west. | 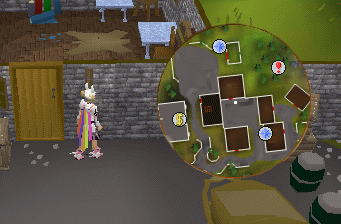 |
| Dig under the Fire at the Village of Goblins. | City Teleports - Falador, then run north to the goblin village. | 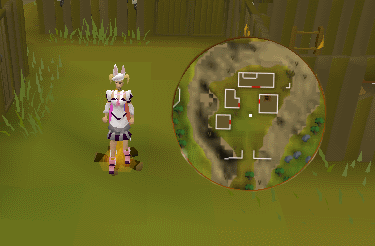 |
| Dig in front of the blessed altar, where duels are held. | This clue is currently broken. | 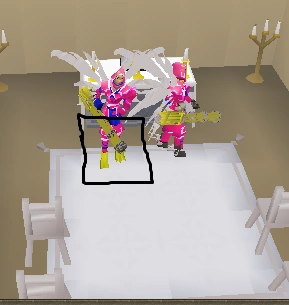 |
| Come to the evil ledge.
Yew know yew want to. Try not to get stung. |
Use the command ::edge and run south to the yew trees. | 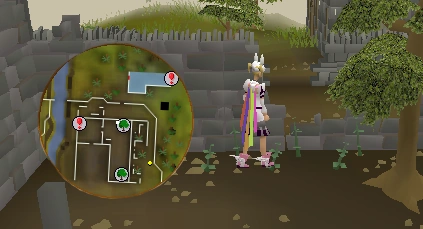
|
| Covered in shadows, the center of the circle is where you will find the answer. | Minigames Teleports - Barrows, then run west following the path across the bridge. | 
|
| A church laying staticly in the sea whom has not seen much life in a while dig outside the rim of the window. | City Teleports - Port Sarim, then run south behind the church. | 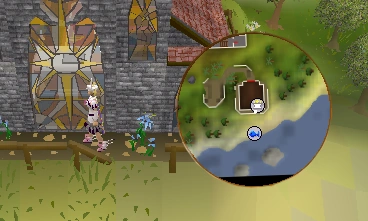
|
| Hint | Location | Location (Image) |
|---|---|---|
| Search the Crates in Varrock Castle’s Courtyard. | City Teleports - Varrock, then run north into the castle, and east to the crates. | 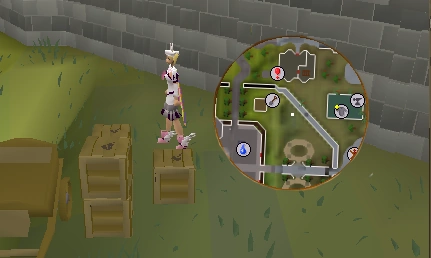 |
| Search the Crate at Catherby’s Pier. | City Teleports - Catherby, then south onto the pier. | 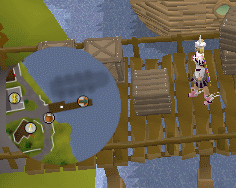 |
| Search the ‘Dead Body’ at the White Wolf Mountain. | City Teleports - Burthorpe, then run south to taverly, west to the entrance of the mountain. Follow the path to the body. | 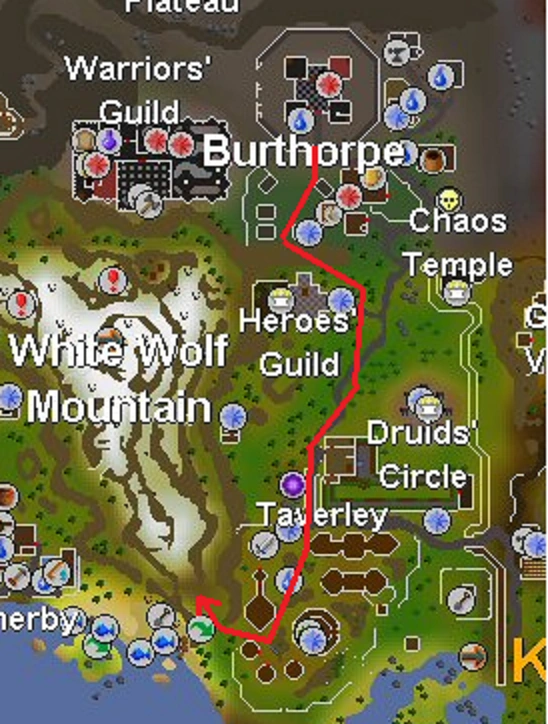 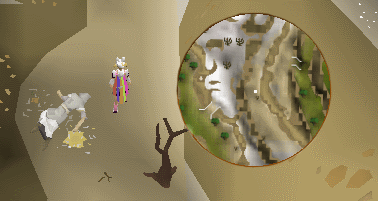 |
| Search the Crates on the Bridge to the Wizard’s Tower. | City Teleports - Draynor Village, then run south onto the bridge. | 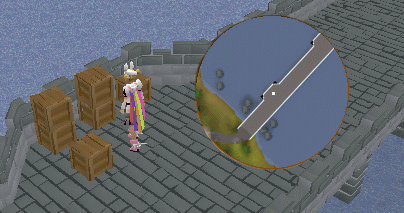 |
| Search the Crate near the Docks a Port Khazard. | City Teleports - Yanille, then run northeast to Port Khazard. | 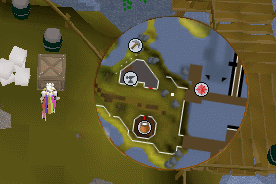 |
| Search the Haystack amidst the Barn, North of Draynor Village. | City Teleports - Draynor Village, then run north along the path to the crossroads, then east to the barn. | 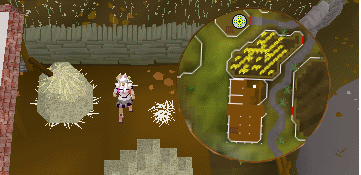 |
| Steal from Draynor’s Market Stall. | City Teleports - Draynor Village, then walk west into the market. | 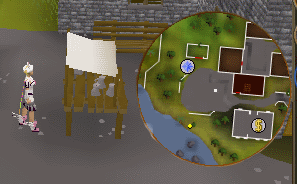 |
| Search the Boxes at Ardougne’s Harbor. | City Teleports - Ardougne, then run south to the boxes near the harbor. | 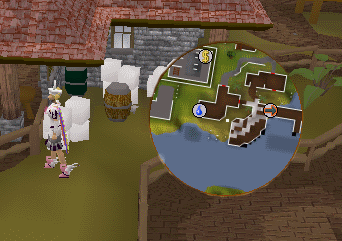 |
| Search the Crate at WitchHaven’s Pier. | City teleports - Ardougne, then run south east.
Yes, we are aware that this Clue is incorrect, as it is actually Ardougne’s Pier. |
 |
| Pick a Thorn from the Thorny Bush, atop of the White Wolf Mountain. | City Teleports - Burthorpe, then run south to taverly, west into the mountains. Follow the mountain path until you reach the peak. | 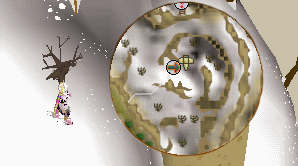 |
| Search the Coffins South of the Town of PK-ers. | Use the command ::edge and run south to the coffins. |  |
|
Search the Crate in Canifis’ Costume Shop. |
City Teleports - Canifis, then run to the north east. | 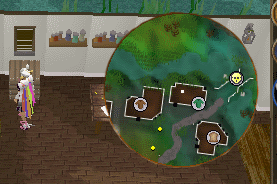 |
| Search the Boxes at the Entrance of the great Tree Village. | City Teleports - Ardougne, then west across the river, north out the gate, and then west to the entrance of the tree gnome stronghold. | 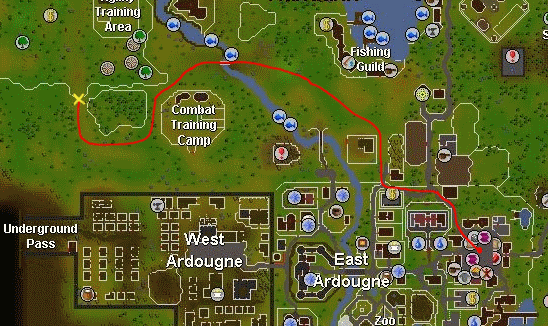 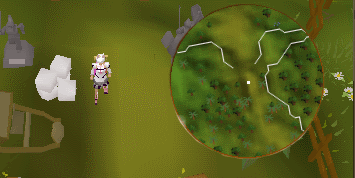 |
| Search the Crate in the house at the Guild of Fishers. | This clue is currently broken. | 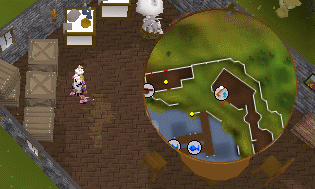 |
| Search the Sacks next to a Bar, in the Town of Magic. | City teleports - Yanille, run west to the bar. | 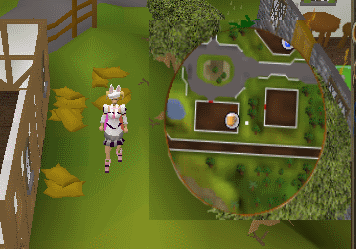 |
| Search the Memorial close to a Waterpump, Somewhere in the Marsh. | Monster Teleports - Mage gray, then run west past the farming spot. | 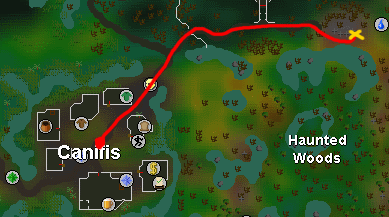 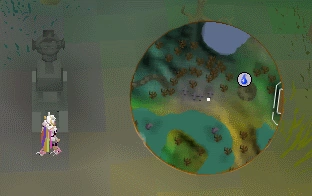 |
| Search the Chest on the Abandoned Ship. | Monster teleports - Mage Gray, then run west until you see the ship to the north. | 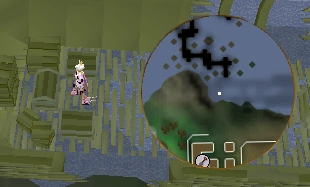 |
| Search the Haystack in the Castle Courtyard. | City Teleports - Ardougne, then run west to the castle. | 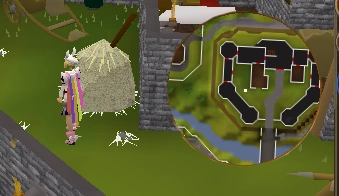 |
| Search the Boxes, amidst the Abandoned Camp. | City Teleports - Ardougne, then run north west to reach the abandoned camp. | 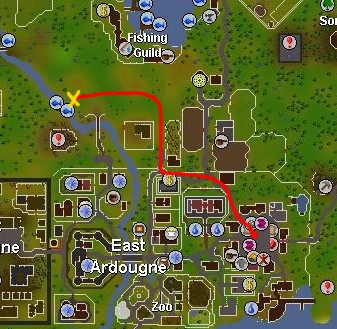 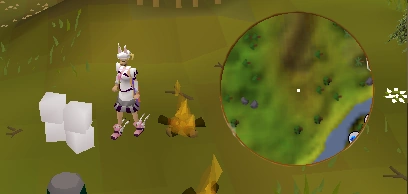 |
| Investigate the Mysterious CoalTruck, North-West of Seer’s Village. | City Teleports - Seers Village, then run north west and follow the tracks to the coal truck. |  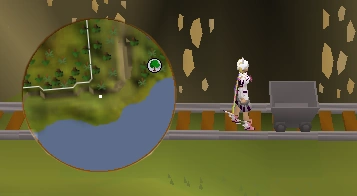 |
| Search the Crate in one of the Tents in Al-Kharid. | City Teleports - Al Kharid, and run into the scimitar shop. | 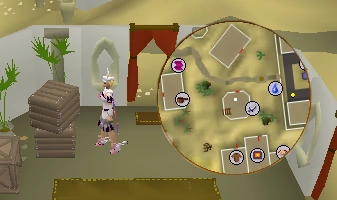 |
| Search the Boxes North of the Great Maze. | City Teleports - Ardougne. Run west to the wall of West ardougne, then south across the battlefield. Cross the river towards the entrance to the maze. | 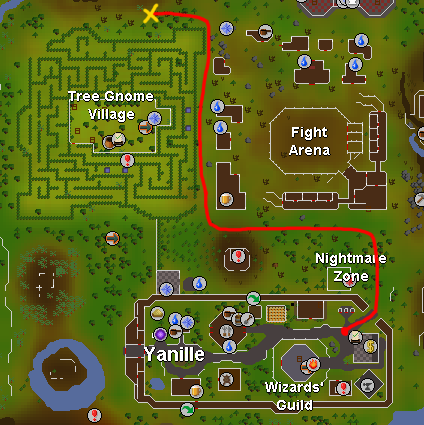 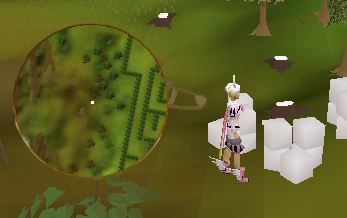 |
| Search the Boxes in a Tent in Burthope. | City Teleports - Burthorpe, then south into the tent. | 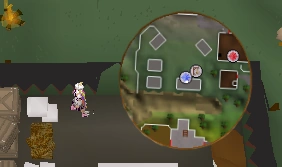 |
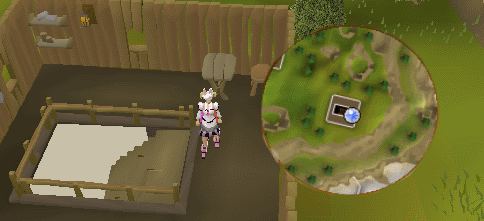
| Inspect the farming patch | City Teleports -> Catherby -> Run north to the farming patch. |  |
| Clue | Task & Area | Location (Image) |
|---|---|---|
|
Equip a pair of iron platelegs, dagger, and a monkey lover. |
::flameking - Flame Torva | 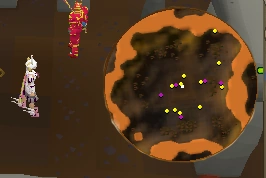 |
|
Equip a pair of Flared Trousers, a Black Cavalier and a pair of Ice gloves and dance at the bar of the Blue Moon Inn. |
City Teleports - Varrock then run south to the blue moon inn. | 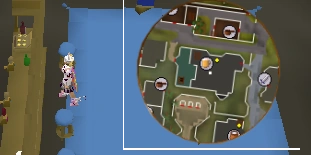 |
| Bow before the Statue of Saradomin, wear nothing at all. Beware of Old Men! | City Teleports - Falador, then run north to the statue. | 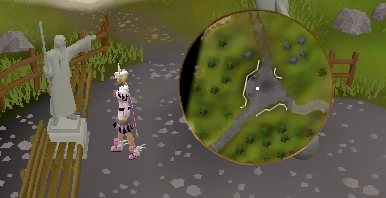 |
| Dance in front of the Make-over Mage's house, wear nothing at all. Beware of Old Men! |
City teleports - Port Sarim, then run north west to the makeover mage's house. |
 |
| Equip a pair of White Wings, a Minecraft Helm and a Minecraft Pickaxe. Bow in front of the Shanty pass. | City Teleports - Al kharid, then run south to the shanty pass. | 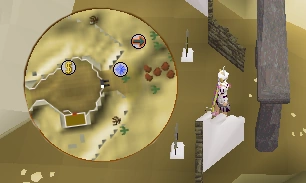 |
| Equip a Glock, Vanguard Gloves, and Karil’s Skirt, and Jig inbetween the torches at the Ardougne Magic Trees. | Type ::WC, then run South to the house with the Magic Trees. | 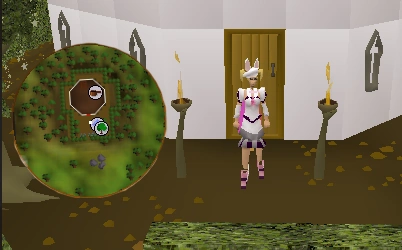 |
| Equip a pair of Barrow Gloves, an Elemental Whip, and a Drygore Offhand. Bow to the one who has no arms. | Wear the Items and Bow in front of iron man at ::shops |  |
| Equip a pair of pirate boots, gilded platebody, gnome scarf and a brutal whip and dance right next to the range at the smithing teleport. | Deceptive Clue, actual location is City Teleports -> Catherby -> Run East | 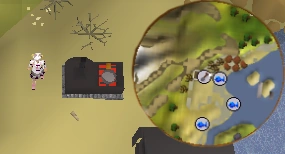 |
| Equip a Royal Sicle, a Rainbow Cape and nothing else.
Goblin Salute to the hidden wall at Dreamscape’s hottest place. |
Type ::flameking - Flame Pernix, then run north to the hidden wall. BE SURE TO USE GOBLIN SALUTE. | 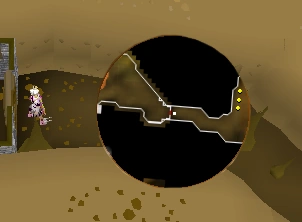 |
| Equip a Rainbow Scarf, a pair of Rainbow Boots, and a Deathcape.
Raspberry at the Bridge north of where werewolves live! |
City Teleports - Canifis, then run north to the broken bridge. | 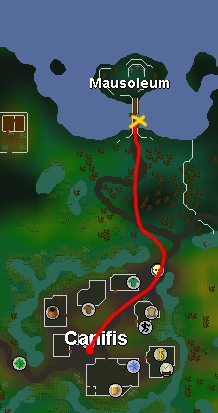 |
| Equip a Vesta’s Chain, a pair of Dharok Platelegs, and a pair of Flowers.
Panic in front of the Haunted Mansion. |
City Teleports - Draynor Village, then follow the path north to draynor mansion. | 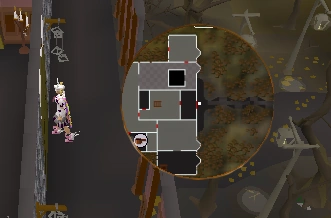 |
| Spin in front of the door that needs a Brass Key to be opened.
Equip nothing but a Chaotic Whip. Beware of Old Men! |
City Teleports - Varrock. Run West to the river, then north without crossing. | 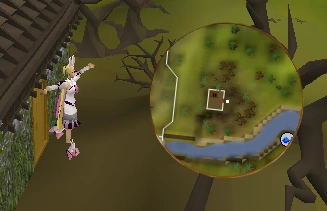 |
| Equip an Assault Rifle, a Gold Chain, and a pair of Steadfast Boots.
Dance in front of Spectral Wall there where the Mage lives. |
Monster Teleports - Mage Gray, then run south to the gate. |  |
| Equip an Katana of stars, Vet’ion pet and a pair of White glass wings and do the zombie dance in-between the 2 statues in front of the Slayer tower. | City Teleports - Canifis - Run North West to the Slayer Tower. | 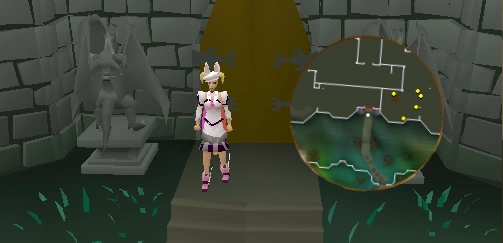 |
| Monters/Bosses by level | ||
|---|---|---|
|
|
|
 |
|---|