m (Protected "Getting Started" ([Edit=Allow only administrators] (indefinite) [Move=Allow only administrators] (indefinite))) |
No edit summary Tag: Source edit |
||
| (8 intermediate revisions by 5 users not shown) | |||
| Line 1: | Line 1: | ||
<center> |
<center> |
||
| − | [[File: |
+ | [[File:Redemption logo.png|Center|400x400px]] |
| − | Welcome to |
+ | Welcome to Redemption! Redemption is a Custom 317 private server! Our developers and staff work to bring in custom NPCs, Armour, Weapons, and Items to make our server a unique experience! This short guide aims to familiarize you with some of our items and equipment, how to get them, and how to progress to the next stage! The guide acts as a loose guide to direct you from starting to end game! |
| − | |||
| − | {{Color|lime| '''Heres a quick video of an overlook of this guide:}} [https://www.youtube.com/watch?v=mZUSoWk8BWk&ab_channel=LeauxkeyGaming|Click here] |
||
== Choosing Your Gamemode == |
== Choosing Your Gamemode == |
||
| − | Upon joining |
+ | Upon joining Redemption for the very first time, you are summoned to choose your gamemode. Redemption offers 3 unique playstyles that will differentiate your experience. Choose wisely as all choices are final for that account! |
{| class="wikitable sortable jquery-tablesorter" style="border-color:red;font-size:13px;line-height:21px;width:600px;style=" cellpadding="2" cellspacing="0" text-align:center; " |
{| class="wikitable sortable jquery-tablesorter" style="border-color:red;font-size:13px;line-height:21px;width:600px;style=" cellpadding="2" cellspacing="0" text-align:center; " |
||
|- |
|- |
||
| − | ! colspan=" |
+ | ! colspan="1" style="text-align:center;" |Type of gamemode |
| − | ! colspan="1" style="text-align:center;" | |
+ | ! colspan="1" style="text-align:center;" |Experience |
| + | ! colspan="2" style="text-align:center;" |Additional Stats |
||
|- |
|- |
||
|style="text-align:center;" |Normal |
|style="text-align:center;" |Normal |
||
| Line 31: | Line 30: | ||
|} |
|} |
||
| + | == Membership Ranks == |
||
| + | {| class="wikitable sortable jquery-tablesorter" style="border-color:red;font-size:13px;line-height:21px;width:347px;style=" cellpadding="2" cellspacing="0" text-align:center; " |
||
| − | == {{color|Lime|Beginner}} == |
||
| + | |- |
||
| − | *When you first begin, the first step is to finish the beginner tutorial that shows up at the top of your screen. By completing this you will be rewarded bonus drop rate! |
||
| + | ! colspan="2" style="text-align:center;" | Redemption offers 4 different membership ranks who can really help you getting started. All Membership Ranks can be purchased [https://redemptionrsps.com/store/store.php?id=54 Here]. |
||
| + | |- |
||
| − | *{{color|lime|The first step to get a huge head start is voting for our server! Voting rewards you with a [[Vote Ticket]] for each website you vote on which can be used at our [[Vote Store]] for amazing rewards! In addition to the tickets, upon voting on all four websites, you receive a [[Vote Box]] which contains a variety of different items. You can either take your chances, or sell the box for a quick and easy 2M+ in our [[Marketplace | player owned shop system!]]}} |
||
| + | |style="text-align:center;" | [[File:BaseMember.png|15px]] [[Base Membership Scroll]] |
||
| + | |style="text-align:center;" |Can be purchased through the store for $15. |
||
| + | |- |
||
| + | |style="text-align:center;" | [[File:ProMember.png|15px]] [[Pro Membership Scroll]] |
||
| + | |style="text-align:center;" |Can be purchased through the store for $35. |
||
| + | |- |
||
| + | |style="text-align:center;" | [[File:PremiumMember.png|15px]] [[Premium Membership Scroll]] |
||
| + | |style="text-align:center;" |Can be purchased through the store for $50. |
||
| + | |- |
||
| + | |style="text-align:center;" | [[File:EliteMember.png|15px]] [[Elite Membership Scroll]] |
||
| + | |style="text-align:center;" |Can be purchased through the store for $100. |
||
| + | |- |
||
| + | [[Category:Donator]] |
||
| − | *Upon completion of the tutorial, head over to our ::soulroom to open your 20 crystal keys you received in your starter bundle. Opening these keys will give you a chance at some quick gear upgrades before your journey begins. |
||
| + | [[Category:Super Donator]] |
||
| − | |||
| + | [[Category:Sponsor]] |
||
| − | *Once you open the 20 crystal keys, head over to ::mbox and start killing penguins. The important drops you should be focusing on are: [[Clue Scrolls]], [[Xebos Invitation]], [[Mimic's Entry Ticket]], [[Infinity Key]], [[Crystal key]], and the [[Mystery box|mystery boxes]]. |
||
| + | |} |
||
| − | |||
| − | *Open your mystery boxes for a chance to get the [[File:Pet_Mystery_Box-0.png|20px]][[Mystery Box Pet]] for extra drop rate bonus! |
||
| − | |||
| − | *If you haven't {{color|lime|voted}} yet and purchased an AoE weapon, your goal is to obtain the |
||
| − | [[File:Penguin_Staff_(u).png|20px]] |
||
| − | [[Penguin Staff (U)]] from Penguins which provides AoE damage. An AoE weapon allows you to kill multiple NPCs at |
||
| − | once! This staff can be upgraded to the [[File:Penguin_Staff_(x).png|20px]][[Penguin Staff (X)]] by using an upgrade |
||
| − | totem dropped by the [[Steroid Penguin Tank]]. The upgraded version deals even more damage! |
||
| − | |||
| − | *Once you have an AoE weapon, you should go into the yellow portal at ::mbox and go up a level, these floors are all multi-combat which will be perfect for your new AoE weapon. You will now be able to kill multiple penguins at once making penguin farming much more efficient. |
||
| − | |||
| − | *Collect as many [[File:Penguin_Bones.png|20px]]Penguin Bones as you can and bank them at the bank booth located at the center of the area. |
||
| − | |||
| − | You will use these bones on the white altar in the ::home bank to get your [[File:Prayer1.png|19px]]Prayer to at least 92 so that you can use Soulsplit. Use Soulsplit everytime you PVM to prevent you from dying. |
||
| − | |||
| − | Most of your collected resource can be used at the [[Soul Room | ::soulroom]] |
||
| + | ==In-Game Tabs== |
||
{| class="wikitable sortable jquery-tablesorter" style="border-color:red;font-size:13px;line-height:21px;width:600px;style=" cellpadding="2" cellspacing="0" text-align:center; " |
{| class="wikitable sortable jquery-tablesorter" style="border-color:red;font-size:13px;line-height:21px;width:600px;style=" cellpadding="2" cellspacing="0" text-align:center; " |
||
|- |
|- |
||
| − | ! colspan=" |
+ | ! colspan="1" style="text-align:center;" |Tab |
| − | ! colspan="1" style="text-align:center;" | |
+ | ! colspan="1" style="text-align:center;" |Picture of the Tab |
| − | ! colspan=" |
+ | ! colspan="2" style="text-align:center;" |Description |
| − | ! colspan="1" style="text-align:center;" |Best Drops |
||
| − | ! colspan="1" style="text-align:center;" |Approx. Hr Profit |
||
|- |
|- |
||
| − | |style="text-align:center;" | |
+ | |style="text-align:center;" |Combat Styles |
| − | |style="text-align:center;" |[[ |
+ | |style="text-align:center;" |[[File:Combat Styles.png|center]] |
| + | |style="text-align:center;" |You can see the weapon you're currently wielding, your combat level, which attack style you're currently using and whether you're auto reatilating or not. (Advised to keep this on) |
||
| − | |style="text-align:center;" |::train |
||
| − | |style="text-align:center;" |Starter |
||
| − | |style="text-align:center;" |[[File:Novice-circle.png]]Novice |
||
| − | |style="text-align:center;" |[[File:Crystal_Key.png|center|20px]][[Crystal key]]s |
||
| − | |style="text-align:center;" |2M |
||
|- |
|- |
||
| − | |style="text-align:center;" | |
+ | |style="text-align:center;" |Skills |
| − | |style="text-align:center;" |[[ |
+ | |style="text-align:center;" |[[File:Skills Screenie.png|center]] |
| + | |style="text-align:center;" |Skills as you know them, the only difference is that there are 3 CUSTOM skills ! [[Karma]], [[Scavenger]] and [[Gambling Skill|Gambling]]. Check out the pages to know more about each skill ! |
||
| − | |style="text-align:center;" |::mbox |
||
| − | |style="text-align:center;" |Starter |
||
| − | |style="text-align:center;" |[[File:Novice-circle.png]]Novice |
||
| − | |style="text-align:center;" |[[File:Clue scroll.png|center|25px]][[Clue scrolls]] |
||
| − | |style="text-align:center;" |1M-50M |
||
|- |
|- |
||
| − | |style="text-align:center;" | |
+ | |style="text-align:center;" |Player Panel |
| − | |style="text-align:center;" |[[ |
+ | |style="text-align:center;" |[[File:Player Panel.png|center]] |
| + | |style="text-align:center;" |One important Tab. This tells the current active player count, your total of referrals <br> which boosts you currently have (Luck/Drop Rate/Double Drop Rate) <br> which [[Daily Events|Daily Event]] is currently happening. ALSO there are 8 other screenshots following further explained ***HERE*** (add quick link - Diamond Bag) |
||
| − | |style="text-align:center;" |Boss Teleport |
||
| − | |style="text-align:center;" |Flame/American |
||
| − | |style="text-align:center;" |[[File:Novice-circle.png]]Novice |
||
| − | |style="text-align:center;" |[[File:Trix_Platebody.png|center]][[Trix Set]] |
||
| − | |style="text-align:center;" |500k |
||
|- |
|- |
||
| − | |style="text-align:center;" | |
+ | |style="text-align:center;" |Inventory |
| − | |style="text-align:center;" |[[ |
+ | |style="text-align:center;" |[[File:Inventory.png|center]] |
| − | |style="text-align:center;" | |
+ | |style="text-align:center;" |Showcases your current inventory |
| − | |style="text-align:center;" |Flame/American |
||
| − | |style="text-align:center;" |[[File:Novice-circle.png]]Novice |
||
| − | |style="text-align:center;" |[[File:Blizzard_Virtus_Top.png|43px]][[Blizzard Set]] |
||
| − | |style="text-align:center;" |500k |
||
|- |
|- |
||
| − | + | |style="text-align:center;" |Equipment Tab |
|
| − | + | |style="text-align:center;" |[[File:Equipment Tab.png|center]] |
|
| + | |style="text-align:center;" |Showcases what you're currently wearing. Clicking the Headpiece and Shield left below will show you how you look for the other players + current bonuses (Attack/Defence/Others). <br> The crossed swords will show you your cosmetics (often if you misclick an item and its gone, you'll find it here) - Any gear can be worn as cosmetic, just not mainhand weapon. |
||
| − | ! colspan="1" style="text-align:center;" |Difficulty |
||
| − | ! colspan="1" style="text-align:center;" |Approx. Non Donator Hr Profit |
||
| − | ! colspan="1" style="text-align:center;" |Approx. Donator Hr Profit |
||
|- |
|- |
||
| − | |style="text-align:center;" | |
+ | |style="text-align:center;" |Prayer List |
| − | |style="text-align:center;" |[[File: |
+ | |style="text-align:center;" |[[File:Prayer List.png|center]] |
| + | |style="text-align:center;" |Redemption has 3 Different Prayer lists, the two common are; Normal Prayers & Lunar <br> The 3rd one however is filled with custom perks. Full detailed list about perks you'll find [[Custom Prayers|here]] . |
||
| − | |style="text-align:center;" |[[AFK Island |::afk]] |
||
| − | |style="text-align:center;" |1 |
||
| − | |style="text-align:center;" |[[File:Novice-circle.png]]Novice |
||
| − | |style="text-align:center;" |500K |
||
| − | |style="text-align:center;" |1000K |
||
|- |
|- |
||
| − | + | |style="text-align:center;" |Magic Spellbook |
|
| + | |style="text-align:center;" |[[File:Magic Spellbook.png|center]] |
||
| + | |style="text-align:center;" |Here you can choose different teleports; Home - Monster - Minigame - Boss - Pking - Skilling - City - Edgeville. Further explained ***HERE*** (add quick link - Diamond Bag) |
||
|- |
|- |
||
| − | + | |style="text-align:center;" |Clan Chat |
|
| + | |style="text-align:center;" |[[File:Clan Chat Screenie.png|center]] |
||
| + | |style="text-align:center;" |You can switch Clan Chat Channels here; "Help" cc is the most common used if you are having questions or are unsure about certain things <br> "Event" is the cc you'd need if you're participating in events <br> "Dice" is the cc you require to be able to gamble. |
||
|- |
|- |
||
| + | |style="text-align:center;" |Friends List |
||
| − | |||
| − | |style="text-align:center;" |[[File: |
+ | |style="text-align:center;" |[[File:Friends List.png|center]] |
| − | |style="text-align:center;" | |
+ | |style="text-align:center;" |Friends you come across Redemption, also players you'd like to ignore |
| + | |- |
||
| − | |style="text-align:center;" |[[File:Flame_Virtus_Equipped.png|40px]] [[Flame Virtus Set]] [[File:Penguin_Staff_(u).png|center|40px]] [[Penguin Staff (U)]] |
||
| + | |style="text-align:center;" |Staff List |
||
| − | |style="text-align:center;" |[[File:American_Torva_Set_Equiped.png|center|50px]] [[American Torva Set]][[File:Golden_Katana.png|center|40px]] [[Golden Katana]] |
||
| − | |style="text-align:center;" |[[File: |
+ | |style="text-align:center;" |[[File:Staff List 1.png|center]] |
| + | |style="text-align:center;" |Another important one to keep an eye out ! You'll find the FULL staff list here, which of the staff are online <br> The "Help" button (When in need of help, press this and you'll be helped as soon as possible) <br> The "Bug" button (if you come across a bug, feel free to add in a full explanation on how it happened, Gyazo Links work in here !) |
||
| − | |style="text-align:center;" |[[File:American_Virtus_Set_Equiped.png|center|50px]] [[American Virtus Set]] [[File:Soulflare.png|center|40px]] [[Soulflare]] |
||
| + | |- |
||
| − | |style="text-align:center;" |[[File:Trix_set.png|center]] [[Trix Set]][[File:Oblivion_Scythe.png|center]] [[Oblivion Scythe]] |
||
| − | |style="text-align:center;" | |
+ | |style="text-align:center;" |Quick Links |
| + | |style="text-align:center;" |[[File:Quick Links.png|center]] |
||
| + | |style="text-align:center;" |Very useful tab ! Most important ones are "Guides List" - "ELO" as they will give you a fair share of information. "Guides List" will include [[Clue scrolls]], [[Arcade]], [[Gear]], [[Pets]], ... |
||
| + | |- |
||
| + | |style="text-align:center;" |Options |
||
| + | |style="text-align:center;" |[[File:Options.png|center]] |
||
| + | |style="text-align:center;" |"Toggle Mouse Button" - clicking on Npcs will give you the rightclick option, but as a leftclick <br> "ABC" - Your personal Yelltag, yellcolor, yellshadow (Need to be Regular Donator) <br> "Split-level-Chat" - Private messages toggle above your chatbox. <br> "Keybinding" - Set the tabs on a special key. <br> "More Options" - Playing on Fixed (1/4th of the screen) - Resizeable (any size to your liking) - Fullscreen (full screened) |
||
| + | |- |
||
| + | |style="text-align:center;" |Emotes |
||
| + | |style="text-align:center;" |[[File:Emotes.png|center]] |
||
| + | |style="text-align:center;" |Your daily dose of emotes (useful for clue scrolls) |
||
|} |
|} |
||
| − | == |
+ | == Shops == |
| − | The intermediate stages include farming revenants, a few bosses, and raids. |
||
| − | *Killing Revenants allow you to farm for pk points to spend at the wilderness shop. |
||
| − | *Some mid-game bosses have great drop tables to upgrade your gear! |
||
| − | *Raids are the doorway to many of the best items in the games such as the dream sets and arrav set! |
||
| − | *As a wonderful reward for taking the time to read this guide, now is a great time to tell you about how donating can give you huge boosts on gear! The [https://dreamscape317.net/store/store.php?id=54 Donation Store] has amazing offers on end game items and mystery boxes that can give amazing items. For reading this guide, use this 5% discount code (wikilife123) on your next donation! |
||
| − | *This is also a great time to start looking into [[Pets]] |
||
| − | *Investing in a [[File:Necromancer_Jr.png|30px]][[Necromancer Jr]] or [[File:Diablo_JR.png|40px]][[Diablo JR]] is highly recommended as these pets heal you as you kill NPCs! This will keep you alive even in sticky situations. |
||
| + | {| border="1" cellpadding="1" cellspacing="1" class="article-table" style="width: 600px;" |
||
| − | *While fighting at Revenants, make sure you are wearing a [[File:Bracelet_of_Ethereum.png|32px]][[Bracelet of Ethereum]]. It specifically prevents revenant damage. |
||
| − | *If you get any [[File:Mysterious_Emblem_Tier8.png]]Mysterious emblems, you will want to sell it to the [[Wilderness Shop]] for points. In order to maximize efficiency, trade in your mysterious emblems when they reach tier 3, then start back over. |
||
| − | *Save up to either donate for a [[File:Collectors_Necklace.png]][[Collector's Necklace]] or buy one from the ::market. A collectors necklace collects your drops and automatically stores it in your bank. |
||
| − | |||
| − | {| class="wikitable sortable jquery-tablesorter" style="border-color:red;font-size:13px;line-height:21px;width:600px;style=" cellpadding="2" cellspacing="0" text-align:center; " |
||
|- |
|- |
||
| − | ! |
+ | ! scope="col" style="text-align:center;"|Shop Name |
| − | ! |
+ | ! scope="col" style="text-align:center;"|Short Description |
| − | ! colspan="1" style="text-align:center;" |Difficulty |
||
| − | ! colspan="1" style="text-align:center;" |Best Drops |
||
| − | ! colspan="1" style="text-align:center;" |Approx. Hr Profit |
||
|- |
|- |
||
| − | |style="text-align:center;" |
+ | | style="text-align:center;"|Sarah's General |
| − | |style="text-align:center;" |
+ | | style="text-align:center;"|General items, going from potions to weaponry. |
| − | |style="text-align:center;" |Boss Teleports |
||
| − | |style="text-align:center;" |Beginner Gear |
||
| − | |style="text-align:center;" |[[File:Intermediate-circle.png]]Intermediate |
||
| − | |style="text-align:center;" |[[File:Mysterious_Emblem_Tier10.png|center]]Mysterious Emblem |
||
| − | |style="text-align:center;" |7K Revenant Points (3M-4M) |
||
|- |
|- |
||
| − | |style="text-align:center;" |
+ | | style="text-align:center;"|Durka Durka |
| − | |style="text-align:center;" |
+ | | style="text-align:center;"|Tools used for skilling mostly & food. |
| − | |style="text-align:center;" |Boss Teleports |
||
| − | |style="text-align:center;" |Intermediate Gear |
||
| − | |style="text-align:center;" |[[File:Intermediate-circle.png]]Intermediate |
||
| − | |style="text-align:center;" |[[File:Undead_Body.png|center]][[Undead Set]] |
||
| − | |style="text-align:center;" |20M |
||
|- |
|- |
||
| − | |style="text-align:center;" |
+ | | style="text-align:center;"|Elissa's Magic Store |
| − | |style="text-align:center;" |
+ | | style="text-align:center;"|Magic items (Gear & Runes). |
| + | |- |
||
| − | |style="text-align:center;" |Boss Teleports |
||
| − | |style="text-align:center;" |
+ | | style="text-align:center;"|Vote Shop |
| − | |style="text-align:center;" |
+ | | style="text-align:center;"|Gear & Weaponry can be bought with Vote Tickets. |
| + | |- |
||
| − | |style="text-align:center;" |[[File:Crystal_(Abyssal_Sire).png|center]][[Sire Crystal]] |
||
| − | |style="text-align:center;" |
+ | | style="text-align:center;"|Loyalty Shop |
| + | | style="text-align:center;"|Rare Items, Titles and Pets can be bought here. Currency; Loyalty Points. |
||
| + | |- |
||
| + | | style="text-align:center;"|Prestige Shop |
||
| + | | style="text-align:center;"|Not worth mentioning atm. |
||
| + | |- |
||
| + | | style="text-align:center;"|Skillcape Shop |
||
| + | | style="text-align:center;"|Not worth mentioning atm. |
||
| + | |- |
||
| + | | style="text-align:center;"|Achievement Shop |
||
| + | | style="text-align:center;"|With Achievement points, you can buy boxes / upgrades for a special cape. |
||
| + | |- |
||
| + | | style="text-align:center;"|Raid Rewards Shop |
||
| + | | style="text-align:center;"|Ultra Rare Drops from Raids can be bought here by spending Raid Points (points per kill at raids). |
||
| + | |- |
||
| + | | style="text-align:center;"|The Arcade Shop Master |
||
| + | | style="text-align:center;"|Diversity of items, useful and cosmetic - also part of medium moneymaker. |
||
| + | |- |
||
| + | | style="text-align:center;"|Wilderness Shop |
||
| + | | style="text-align:center;"|Starter Items and Boxes can be found here, with spending ::pkp (Pkpoints). |
||
| + | |- |
||
| + | | style="text-align:center;"|King Percival |
||
| + | | style="text-align:center;"|Tells you random info, doesn't sell items. |
||
| + | |- |
||
| + | | style="text-align:center;"|Donator Shop |
||
| + | | style="text-align:center;"|Sells a diversity of items who are also found in the ::store - Bonds would be needed to buy things here. |
||
| + | |- |
||
| + | | style="text-align:center;"|Roachey |
||
| + | | style="text-align:center;"|Diversity of items, mostly cosmetic ones which can be bought with Donator Points (which you receive for each donation). |
||
| + | |- |
||
| + | | style="text-align:center;"|Black Market Dealer |
||
| + | | style="text-align:center;"|Selling very very useful starter stuff you definitely need ! Worth your while to check it out. |
||
| + | |- |
||
| + | | style="text-align:center;"|Milestone |
||
| + | | style="text-align:center;"|Right Clicking him will grant you a cape when you reach all skills 10-20-30-... |
||
| + | |- |
||
| + | | style="text-align:center;"|Iron Man |
||
| + | | style="text-align:center;"|If you're an Ironman and claimed a Donator scroll, you'd lose your "Iron Man" title, talking to him will revert this. (you still hold the rank though) |
||
| + | |- |
||
| + | | style="text-align:center;"|Referral Shop |
||
| + | | style="text-align:center;"|If a friend of you joins and refers to you, you get a point. You could buy good items from this shop then with those refers. (Abuse will be noticed) |
||
| + | |- |
||
| + | | style="text-align:center;"|Pet Point Shop |
||
| + | | style="text-align:center;"|All different kinds of pets can be bought here, with ultra pet Points (when opening Ultra Pet Boxes, you get 1 point). |
||
| + | |- |
||
| + | | style="text-align:center;"|Clue Scroll Shop |
||
| + | | style="text-align:center;"|Items needed for solving Clue Scrolls, can be found here. (Barrows Gloves not, as they are obtained on another way.) |
||
| + | |- |
||
| + | | style="text-align:center;"|Box Set Maker |
||
| + | | style="text-align:center;"|Diversity of boxes can be found here, if you have loose pieces - this man will attach them together to save up inventory space. |
||
|} |
|} |
||
| − | '''Disclaimer''' Hourly profit is calculated based on estimated drop rates and may not depict actual hourly profit for each person |
||
| + | == Moneymakers == |
||
| + | <tabber> |
||
| − | '''Below you can see some examples of our [[Upgrades | Upgrade]] system!''' |
||
| − | *If you're feeling lucky and want to make a huge step in your gear, go to ::upgrade |
||
| − | *At the upgrade area you have the chance to turn some items into truly amazing gear! *'''but be careful, you can lose the items!'''* |
||
| + | |||
| − | {| class="wikitable sortable jquery-tablesorter" style="border-color:red;font-size:13px;line-height:21px;width:600px;style=" cellpadding="2" cellspacing="0" text-align:center; " |
||
| + | |-|Starter= |
||
| + | |||
| + | {| border="1" cellpadding="1" cellspacing="1" class="article-table" style="width: 600px;" |
||
|- |
|- |
||
| − | ! |
+ | ! scope="col" style="text-align:center;"|Moneymaker |
| + | ! scope="col" style="text-align:center;"|How to get the money |
||
| + | ! scope="col" style="text-align:center;"|More in-depth guide [https://redemptionrsps.fandom.com/wiki/Money_Making Here]. |
||
| + | |||
|- |
|- |
||
| − | |style="text-align:center;" |
+ | | style="text-align:center;"|[[Slayer | Slayer Task (Easy)]] |
| + | | style="text-align:center;"|Easy Slayer tasks are super easy and can very beneficial when it comes to making money. |
||
| − | |style="text-align:center;" |[[File:American_Torva_Platebody.png|center]] [[American Torva Set]] upgraded = [[File:American_Torva_Platebody_(u).png|center]] [[American Torva Set (u)]] |
||
| + | |- |
||
| − | |style="text-align:center;" |[[File:Collectors_Necklace.png|center]] [[Collector's Necklace]] upgraded = [[File:Amulet_of_blood-0.png|center]] [[Amulet of Blood]] |
||
| − | |style="text-align:center;" |
+ | | style="text-align:center;"|[[Clue Scrolls | Clue Scrolls (Easy)]] |
| + | | style="text-align:center;"|Easy Slayer tasks are super easy and can very beneficial when it comes to making money. |
||
| − | |style="text-align:center;" |[[File:BFG9000.png|center]] [[BFG9000]] upgraded = [[File:BFG9000i.png|center]] [[BFG9000 (i)]] |
||
| + | |- |
||
| − | |style="text-align:center;" |[[File:Emperor`s_Ring_Icon.png|center]] [[Emperor`s Ring]] upgraded = [[File:Emperor`s_Ring_i.png|center]] [[Emperor`s Ring (i)]] |
||
| − | |style="text-align:center;" |
+ | | style="text-align:center;"|[[Revenants]] |
| + | | style="text-align:center;"|Quick money making in the wilderness cave. You will note lose your items if you die. |
||
| + | |||
|} |
|} |
||
| + | |-| Mid-Game= |
||
| + | {| border="1" cellpadding="1" cellspacing="1" class="article-table" style="width: 600px;" |
||
| + | |- |
||
| + | ! scope="col" style="text-align:center;"|Moneymaker |
||
| + | ! scope="col" style="text-align:center;"|How to get the money |
||
| + | |- |
||
| + | | style="text-align:center;"|[[Abyssal Sire]] |
||
| + | | style="text-align:center;"|Abyssal Sire is a boss requiring you to kill 4 respirator systems but can drop great loot. |
||
| + | |- |
||
| + | | style="text-align:center;"|[[Clue Scrolls | Clue Scrolls (Hard)]] |
||
| + | | style="text-align:center;"|Hard Clue Scrolls has a chance to be dropped from any types of monsters throughout the server. |
||
| + | |- |
||
| + | | style="text-align:center;"|[[Arcade | DC Arcade]] |
||
| + | | style="text-align:center;"|A quick minigame of 5 different waves of your favourite heroes. |
||
| + | |- |
||
| + | | style="text-align:center;"|[[Dreamland]] |
||
| + | | style="text-align:center;"|A long minigame with 100 waves but greatly worth it upon completion. |
||
| + | |- |
||
| + | | style="text-align:center;"|[[Slayer | Slayer (Hard Task)]] |
||
| + | | style="text-align:center;"|Hard tasks cost 25 slayer points and requires a Mid-Game gear setup. |
||
| + | |- |
||
| + | | style="text-align:center;"|[[Skotizo]] |
||
| + | | style="text-align:center;"|Skotizo is a good way of making some quick money if you are lucky. To kill Skotizo you'll need to kill the werewolves outside for the '''Skotizo Key'''. |
||
| + | |- |
||
| + | | style="text-align:center;"|[[Vorkath]] |
||
| + | | style="text-align:center;"|Vorkath is a boss requiring constant movement to avoid dying. |
||
| + | |- |
||
| + | | style="text-align:center;"|[[Theatre of Blood]] |
||
| + | | style="text-align:center;"|Same as the Nightmare, only difference is; This raid can only be done with a party of max |
||
| + | |- |
||
| + | | style="text-align:center;"|[[Strykewyrm Minigame | Strykewyrm Minigame (Normal)]] |
||
| + | | style="text-align:center;"|Strykewyrm Minigame is a challenging raid which cost 50.000 to start but can be worth it upon completion. |
||
| + | |} |
||
| + | |-| End-Game= |
||
| − | '''Next up is our Raids!''' |
||
| + | {| border="1" cellpadding="1" cellspacing="1" class="article-table" style="width: 600px;" |
||
| − | *By teleporting to raids (either via the raid teleport window in the magic tab or via the respective ::joinraid command) you can join other players to take on some of the most fearsome NPCs DreamScape has to offer! |
||
| − | *These raids house some of the best drops to upgrade your gear or your pad your pocketbook. |
||
| − | *The top three players in each raid will receive a random reward from the drop table for that raid. This allows end game players to carry newer players while allowing the newer players to still get drops. |
||
| − | *For newer players, it is highly recommended that you wear the blizzard set if you are getting carried by a higher player for the added luck bonus. Take a look at other Luck bonus material at [[File:Luck.png|30px]][[Luck Boosters]]. |
||
| − | *Don't fret if you don't receive any drops at first. Each time you take part in a raid kill you will earn Raid Points that can be used at the [[Raid Point Shop]] for guaranteed rewards! |
||
| − | |||
| − | |||
| − | {| class="wikitable sortable jquery-tablesorter" style="border-color:red;font-size:13px;line-height:21px;width:600px;style=" cellpadding="2" cellspacing="0" text-align:center; " |
||
|- |
|- |
||
| − | ! |
+ | ! scope="col" style="text-align:center;"|Moneymaker |
| − | ! |
+ | ! scope="col" style="text-align:center;"|How to get the money |
| − | ! colspan="1" style="text-align:center;" |Difficulty |
||
| − | ! colspan="1" style="text-align:center;" |Best Drops |
||
| − | ! colspan="1" style="text-align:center;" |Approx. Hr Profit |
||
|- |
|- |
||
| − | |style="text-align:center;" |
+ | | style="text-align:center;"|[[Yu-Gi-Oh Raid]] |
| − | |style="text-align:center;" |
+ | | style="text-align:center;"|A raid with 3 different difficulties and 5 waves of VERY hard bosses. |
| − | |style="text-align:center;" |::joinraid1 |
||
| − | |style="text-align:center;" |Beginner Gear |
||
| − | |style="text-align:center;" |[[File:Intermediate-circle.png]]Intermediate |
||
| − | |style="text-align:center;" |[[File:Dream_Mage_Body.png|center]][[Dream Mage Set]] |
||
| − | |style="text-align:center;" |15M |
||
|- |
|- |
||
| − | |style="text-align:center;" |
+ | | style="text-align:center;"|[[Arcade | DC Universe]] |
| − | |style="text-align:center;" |
+ | | style="text-align:center;"|A quick minigame of 5 different waves of your favourite heroes. |
| − | |style="text-align:center;" |::joinraid2 |
||
| − | |style="text-align:center;" |Beginner Gear |
||
| − | |style="text-align:center;" |[[File:Intermediate-circle.png]]Intermediate |
||
| − | |style="text-align:center;" |[[File:Avery_ring_i.png|center]][[Avery's Ring]] |
||
| − | |style="text-align:center;" |15M |
||
|- |
|- |
||
| − | |style="text-align:center;" |
+ | | style="text-align:center;"|[[Slayer | Slayer (Boss Task)]] |
| − | |style="text-align:center;" |
+ | | style="text-align:center;"|Boss tasks cost 2500 slayer points and is VERY hard. |
| − | |style="text-align:center;" |::joinraid3 |
||
| − | |style="text-align:center;" |Beginner Gear |
||
| − | |style="text-align:center;" |[[File:Intermediate-circle.png]]Intermediate |
||
| − | |style="text-align:center;" |[[File:Dream_Body.png|center]][[Dream Set]] |
||
| − | |style="text-align:center;" |15M |
||
|- |
|- |
||
| − | |style="text-align:center;" |
+ | | style="text-align:center;"|[[Dreamland]] |
| − | |style="text-align:center;" |
+ | | style="text-align:center;"|A long minigame with 100 waves but greatly worth it upon completion. |
| − | |style="text-align:center;" |::joinraid4 |
||
| − | |style="text-align:center;" |Beginner Gear |
||
| − | |style="text-align:center;" |[[File:Intermediate-circle.png]]Intermediate |
||
| − | |style="text-align:center;" |[[File:Dream_range_body.png|center]][[Dream Range Set]] |
||
| − | |style="text-align:center;" |15M |
||
|- |
|- |
||
| − | |style="text-align:center;" |
+ | | style="text-align:center;"|[[Alchemical Hydra]] |
| − | |style="text-align:center;" |
+ | | style="text-align:center;"|Requiring the Alchemical Hydra to be moved into the different pools upon losing health and changing colors. |
| + | |- |
||
| − | |style="text-align:center;" |::joinraid5 |
||
| − | |style="text-align:center;" |
+ | | style="text-align:center;"|[[Vorkath]] |
| − | |style="text-align:center;" |
+ | | style="text-align:center;"|Vorkath is a boss requiring constant movement to avoid dying. |
| + | |- |
||
| − | |style="text-align:center;" |[[File:Eternal_Crystal_Platebody.png|center]][[Crystal Set]] |
||
| − | |style="text-align:center;" |
+ | | style="text-align:center;"|[[Chamber of Xeric]] |
| + | | style="text-align:center;"|A hard mechanical raid requiring melee, ranged and mage weapons to complete. |
||
| + | |- |
||
| + | | style="text-align:center;"|[[Strykewyrm Minigame | Strykewyrm Minigame (Hard)]] |
||
| + | | style="text-align:center;"|Strykewyrm Minigame is a hard minigame requiring the '''Lava Strykewyrm Set''' in your inventory. |
||
| + | |- |
||
| + | | style="text-align:center;"|[[Clue Scrolls | Clue Scrolls (Elite)]] |
||
| + | | style="text-align:center;"|Elite Clue Scrolls has a chance to be dropped from any types of monsters throughout the server and HIGHLY beneficial. |
||
| + | |- |
||
| + | |||
|} |
|} |
||
| + | </tabber> |
||
| + | == Teleport Interface == |
||
| + | [[File:Teleportation Dashboard.png]] |
||
| + | <br> |
||
| + | What are the different features of the Teleport Interface? |
||
| + | [[File:Teleportation Favourites 2.png]] |
||
| − | '''The Arcade is great source of cape progressions!''' |
||
| + | <br> |
||
| − | *The regular [[File:Infernal.png]][[Infernal Cape]] is the first target as an intermediate player. |
||
| − | *The extreme arcade unlocks the [[File:Tribrid_Infernal_Cape_rainbow.png|33px]][[Tribrid Infernal Cape]], the next step for capes. |
||
| − | *The Hell arcade is for the true elite players and unlocks the best cape in the game, the [[File:Tribrid_Inferno_Cape.png|40px]][[Tribrid Inferno Cape]]. |
||
| + | Above you can see all the types of teleports, Bosses - Raids - ..., clicking one of those will provide you further info about that section. <br> |
||
| − | {| class="wikitable sortable jquery-tablesorter" style="border-color:red;font-size:13px;line-height:21px;width:600px;style=" cellpadding="2" cellspacing="0" text-align:center; " |
||
| + | Then, you have the teleports shown in that section; Bosses ->Abbysal Sire, Alchemical Hydra... |
||
| + | Inside this list, there are 2 features, either an instant link towards it's Wiki Page, or it's difficulty (Green = Easy, Yellow = Medium, Red = Hard). <br> |
||
| + | Another option is to include one of the teleports towards your "favourites", which means the following. Instead of heading over to the teleport you'd like to use, you just click on it in the bottom right corner of the screen and you will be teleported there straight away (Max 3 Favourites). |
||
| + | <br> |
||
| + | But that's not all the Teleport Interface has to offer! You can also see which items the Bosses /Raids Drop and a small description about them. When you click on the little arrow right below the shown items, the full droptable will be shown ! <br> |
||
| + | |||
| + | <tabber> |
||
| + | |||
| + | Bosses= |
||
| + | These are all the bosses you can easily teleport towards. |
||
| + | * [[Abyssal Sire]] |
||
| + | * [[Alchemical Hydra]] |
||
| + | * [[Cerberus]] |
||
| + | * [[Corporeal Beast]] |
||
| + | * [[Hades]] |
||
| + | * [[Lachrym The Undying]] |
||
| + | * [[Oblivion Dragon]] |
||
| + | * [[Skotizo]] |
||
| + | * [[The Nightmare]] |
||
| + | * [[Vorago]] |
||
| + | * [[Vorkath]] |
||
| + | * [[Zulrah]] |
||
| + | |||
| + | |-|Raids= |
||
| + | Here are all the possible raids you can enter. |
||
| + | * [[Arrav]] |
||
| + | * [[Arcade|Avengers]] |
||
| + | * [[Arcade|DC Universe]] |
||
| + | * [[Diablo]] |
||
| + | * [[Ninja Turtles]] |
||
| + | * [[OG Dragon]] |
||
| + | * [[Raiden]] |
||
| + | * [[Star Wars Raid]] |
||
| + | * [[Arcade]] |
||
| + | * [[Theatre of Blood]] |
||
| + | * [[Vendura]] |
||
| + | * [[Voldemort]] |
||
| + | * [[Yu-Gi-Oh Raid]] |
||
| + | * [[Chamber of Xeric]] |
||
| + | |||
| + | |-|Monsters= |
||
| + | Here are all the possible monsters you can kill. |
||
| + | * [[Chaos elemental]] |
||
| + | * [[Masamune]] & [[Hanzou]] |
||
| + | * [[Groudon]] |
||
| + | * [[Guardian of Am'orth]] |
||
| + | * [[Icy Skeleton]] |
||
| + | * [[Magegray]] |
||
| + | * [[Mini Bosses]] |
||
| + | * [[Olaf]] |
||
| + | * [[Penguin]] |
||
| + | * [[Phoenix]] |
||
| + | * [[Revenants]] |
||
| + | * [[Riley Raid]] |
||
| + | * [[Sea Troll Queen]] |
||
| + | * [[Shadow King]] |
||
| + | * [[Strykewyrms]] |
||
| + | * [[Necromancer]] |
||
| + | * [[Train Teleport]] |
||
| + | * [[Undead Lancelot]] |
||
| + | |||
| + | |-|Minigames= |
||
| + | Here you will find the different minigames Redemption has to offer. |
||
| + | * [[Barrows]] |
||
| + | * [[Dice Zone]] |
||
| + | * [[Event Zone]] |
||
| + | * [[Dreamland]] |
||
| + | * [[Pest Control]] |
||
| + | |||
| + | |-|Cities= |
||
| + | A diversity of cities you can teleport towards. |
||
| + | * Al Kharid |
||
| + | * Ardougne |
||
| + | * Burthorpe |
||
| + | * Canifis |
||
| + | * Catherby |
||
| + | * Draynor Village |
||
| + | * Falador |
||
| + | * Lumbridge |
||
| + | * Port Sarim |
||
| + | * Seers' Village |
||
| + | * Varrock |
||
| + | * Yanille |
||
| + | |||
| + | |-|Miscellanious= |
||
| + | Last but not least, all the different zones you can use to your liking. |
||
| + | * [[Shops]] |
||
| + | * [[Upgrades]] |
||
| + | * [[Marketplace]] |
||
| + | * [[Slayer Tower]] |
||
| + | * [[Cartoon Tower]] |
||
| + | * [[Drop Party Room]] |
||
| + | * [[Soul Room]] |
||
| + | * [[Uncle PennyBags]] |
||
| + | * [[Scrooge McDuck]] |
||
| + | * [[Sponsor|Sponsor Zone]] |
||
| + | * [[Executive|Executive Zone]] |
||
| + | * [[Platinum|Platinum Zone]] |
||
| + | * [[Bomberman]] |
||
| + | * [[Miss Fortune]] |
||
| + | * [[Mr X]] |
||
| + | |||
| + | </tabber> |
||
| + | |||
| + | == Useful In-Game Commands == |
||
| + | |||
| + | {| class="wikitable dropstable rdtable" style="text-align:center" cellpadding="2" cellspacing="0" data-expandtext="show" data-collapsetext="hide" |
||
|- |
|- |
||
| − | ! colspan=" |
+ | ! colspan="10" style="min-width:250px" |Teleports |
| − | ! colspan="1" style="text-align:center;" |Blizzard |
||
| − | ! colspan="1" style="text-align:center;" |Difficulty |
||
| − | ! colspan="1" style="text-align:center;" |Best Drops |
||
| − | ! colspan="1" style="text-align:center;" |Number of Waves |
||
|- |
|- |
||
| − | + | ! scope="col" style="text-align:center;"|Teleport Command |
|
| − | + | ! scope="col" style="text-align:center;"|Information / Use |
|
| − | |style="text-align:center;" |::arcade |
||
| − | |style="text-align:center;" |Intermediate Gear |
||
| − | |style="text-align:center;" |[[File:Intermediate-circle.png]]Intermediate |
||
| − | |style="text-align:center;" |[[File:Infernal.png|center]][[Infernal Cape]] |
||
| − | |style="text-align:center;" |Waves 1-50 |
||
|- |
|- |
||
| − | |style="text-align:center;" | |
+ | |style="text-align:center;" |::forums |
| − | |style="text-align:center;" | |
+ | |style="text-align:center;" |Gets you directed straight to the forums, where giveaways take place occasionally. |
| − | |style="text-align:center;" |::arcade |
||
| − | |style="text-align:center;" |Intermediate Gear |
||
| − | |style="text-align:center;" |[[File:Intermediate-circle.png]]Intermediate |
||
| − | |style="text-align:center;" |[[File:Infernal_Mage_Cape.png|center]][[File:Infernal_Melee_Cape.png|center]][[File:Infernal_Range_Cape.png|center]][[File:Tribrid_Infernal_Cape_rainbow.png|center|33px]] |
||
| − | |style="text-align:center;" |Waves 1-55 |
||
|- |
|- |
||
| − | |style="text-align:center;" | |
+ | |style="text-align:center;" |::wiki |
| − | |style="text-align:center;" | |
+ | |style="text-align:center;" |Gets you directed straight to the wiki, where all your necesary information is. |
| − | |style="text-align:center;" |::arcade |
||
| − | |style="text-align:center;" |Intermediate Gear |
||
| − | |style="text-align:center;" |[[File:Experienced-circle.png|center]]Expert |
||
| − | |style="text-align:center;" |[[File:Tribrid_Inferno_Cape.png|center|40px]][[Tribrid Inferno Cape]] |
||
| − | |style="text-align:center;" |Waves 1-55 |
||
|- |
|- |
||
| − | + | |style="text-align:center;" |::discord |
|
| + | |style="text-align:center;" |Gets you directed straight to the discord, where events happen on a daily base and occasionally a giveaway. |
||
|- |
|- |
||
| − | + | |style="text-align:center;" |::bank |
|
| + | |style="text-align:center;" |Gives you access to your own bank anywhere within Redemption. (Need to be Super Donator+) |
||
|- |
|- |
||
| − | |style="text-align:center;" | |
+ | |style="text-align:center;" |::event |
| − | |style="text-align:center;" | |
+ | |style="text-align:center;" |Daily hosted events by our Event Managers, free loot! |
| + | |- |
||
| − | |style="text-align:center;" |[[File:Devious_Set.png|center]][[Devious Set]] [[File:Ak-47_Asiimov.png|center]] [[Ak-47 Asiimov]] |
||
| − | |style="text-align:center;" | |
+ | |style="text-align:center;" |::shops |
| + | |style="text-align:center;" |Access to where most of the shops are aligned. |
||
| − | [[File:Sword_of_the_protectorate.png|center]] [[Sword of the Protectorate]] |
||
| + | |- |
||
| − | |style="text-align:center;" |[[File:Crystal_Set_1.png|center]] [[Eternal Crystal Set]] [[File:Infinity Gauntlets Charged.png|center]] [[Infinity Gauntlet (Charged)]] |
||
| + | |style="text-align:center;" |::dp |
||
| + | |style="text-align:center;" |Teleports you to the Dropparty Room (Every $750) donated, automatically drops a variety of decent items. |
||
| + | |- |
||
| + | |style="text-align:center;" |::soulroom |
||
| + | |style="text-align:center;" |When you have obtained souls from killing Npc's, or if you want to open your Crystal Keys. |
||
| + | |- |
||
| + | |style="text-align:center;" |::vote |
||
| + | |style="text-align:center;" |Free loot when you have voted, because why not! |
||
| + | |- |
||
| + | |style="text-align:center;" |::voteboss |
||
| + | |style="text-align:center;" |After voting you can access this [[Vote boss]] for free ! Top 25 hitters get loot. |
||
| + | |- |
||
| + | |style="text-align:center;" |::upgrade |
||
| + | |style="text-align:center;" |Certain items can be upgraded, check out the full list at [[Upgrades]]. |
||
|} |
|} |
||
| − | == Expert == |
||
| − | Now that you have some better gear, it's time to start honing in on reach end game items! The following bosses have some of the best drops in game, allowing you to truly maximize money making and gear progression! |
||
| − | *As you continue to progress, advancing your pet is very important! The [[Thanos Pet]] is a great pet to add to your set up as this pet helps increase your Damage output while also healing your hitpoints and restoring your prayer! You can even upgrade this pet to a [[Ultron Pet]] for even more bonuses. |
||
| + | == What you should aim for == |
||
| − | {| class="wikitable sortable jquery-tablesorter" style="border-color:red;font-size:13px;line-height:21px;width:600px;style=" cellpadding="2" cellspacing="0" text-align:center; " |
||
| + | |||
| + | Within Redemption, your account can go many different ways. It all depends on what you're looking for in the game. |
||
| + | |||
| + | <tabber> |
||
| + | |||
| + | Pvming= |
||
| + | What you'd need to focus on within Pvming, would be ofcourse getting a decent Gear Set-up which can be upgraded within a few weeks / months purely by grinding. <br> |
||
| + | With Pvming there are 2 main perks you need to focus on, '''Damage''' and '''Drop Rate'''. <br> |
||
| + | The Damage is self explanatory, you'd need it so you can kill the Npc's much quicker instead of having to stare 5 minutes at your screen per kill. <br> |
||
| + | Drop Rate however is another recommended perk. |
||
| + | Drop Rate itself is basically reducing your amount of kills required in order to get a drop. There is a variety of items which can give you a huge boost in this perk. <br> |
||
| + | |||
| + | After these 2 main perks, Redemption has 2 other perks to offer aswell; [[Luck]] and '''Double Drop Rate'''. <br> |
||
| + | Luck itself can get you more perks aswell. |
||
| + | * Opening boxes (e.g. mystery boxes and all donation boxes) |
||
| + | * Soul room keys ultra rare drops |
||
| + | * Raids - rare/ultra rare rewards |
||
| + | * Birds nests/eagles nests - rare rewards (e.g. row i) |
||
| + | * Clue Scrolls |
||
| + | You can get up to a maximum of 100% Luck. <br> |
||
| + | |||
| + | Then there is '''Double Drop Rate'''. In case you would be '''luck'''y enough to get a drop from an Npc, getting your Double Drop Rate up could get you a possible Double Drop. When you have progressed further in the game, this is very useful considering you can get insane drops and having these not doubled, would be painful to see. <br> |
||
| + | This perk is also capped at a maximum of 100%. You can get higher, but it wouldn't be much of a difference. |
||
| + | |||
| + | |||
| + | |-|Gambling= |
||
| + | |||
| + | If you're looking to get rich or die trying, below you will find the different kind of Gambles Redemption has to offer for you. <br> |
||
| + | |||
| + | Make sure when you are making a bet or accepting one, you DOUBLECHECK the other players bet. |
||
| + | |||
| + | {| class="wikitable dropstable rdtable" style="text-align:center" border="1" cellpadding="2" cellspacing="0" data-expandtext="show" data-collapsetext="hide" |
||
|- |
|- |
||
| − | ! colspan=" |
+ | ! colspan="10" style="min-width:250px" |Gambling |
| − | ! colspan="1" style="text-align:center;" |Minimum Gear |
||
| − | ! colspan="1" style="text-align:center;" |Difficulty |
||
| − | ! colspan="1" style="text-align:center;" |Best Drops |
||
| − | ! colspan="1" style="text-align:center;" |Approx. Hr Profit |
||
|- |
|- |
||
| − | + | ! scope="col" style="text-align:center;"|Gamble Name |
|
| − | + | ! scope="col" style="text-align:center;"|Information / Use |
|
| − | |style="text-align:center;" |Boss Teleport |
||
| − | |style="text-align:center;" |Intermediate |
||
| − | |style="text-align:center;" |[[File:Experienced-circle.png|center]]Expert |
||
| − | |style="text-align:center;" |[[File:Arrav_Body.png|center]][[Arrav Set]] |
||
| − | |style="text-align:center;" |25M |
||
|- |
|- |
||
| − | |style="text-align:center;" |
+ | | scope="col" style="text-align:center;" style="border-bottom:1px solid white"|Dice Duel |
| + | | scope="col" style="text-align:center;" style="border-bottom:1px solid white"|Duel Ft (First to) 1 - 3 - 5: Place your bet, choose the number you want to get Ft'd for, check the bet again and gamble away. Who ever gets First to 1/3/5 wins the pot. Rolls from 0 -> 100. |
||
| − | |style="text-align:center;" |[[Vorkath]] |
||
| − | |style="text-align:center;" |Boss Teleport |
||
| − | |style="text-align:center;" |Intermediate |
||
| − | |style="text-align:center;" |[[File:Experienced-circle.png|center]]Expert |
||
| − | |style="text-align:center;" |[[File:Dragonfire Ward.png|center]][[Dragonfire Ward]][[File:Odium Ward.png|center]][[Odium Ward]][[File:Ancient Wyvern Shield.png|center]] [[Ancient Wyvern Shield]] |
||
| − | |style="text-align:center;" |N/A |
||
|- |
|- |
||
| − | |style="text-align:center;" |
+ | | scope="col" style="text-align:center;" style="border-bottom:1px solid white"|Flower Poker |
| + | | scope="col" style="text-align:center;" style="border-bottom:1px solid white"|Try getting lucky with the automated Flower Poker system. Bust < 1 Pair < 2 Pair < 3 of a Kind < Full House < 4 of a Kind < 5 of a Kind. |
||
| − | |style="text-align:center;" |[[Skotizo]] |
||
| − | |style="text-align:center;" |Boss Teleport |
||
| − | |style="text-align:center;" |Intermediate |
||
| − | |style="text-align:center;" |[[File:Experienced-circle.png|center]]Expert |
||
| − | |style="text-align:center;" |[[File:Skotizo Ancestral Body.png|center]] [[Skotizo Set]] |
||
| − | |style="text-align:center;" |50M |
||
|- |
|- |
||
| − | |style="text-align:center;" |
+ | | scope="col" style="text-align:center;" style="border-bottom:1px solid white"|Npc Duel |
| + | | scope="col" style="text-align:center;" style="border-bottom:1px solid white"|Accept the terms and let Redemptions' NPC's fight it out for you ! Godzilla or Donkey Kong, who will win!? |
||
| − | |style="text-align:center;" |[[Hades]]/[[Enraged Hades]] |
||
| − | |style="text-align:center;" |Boss Teleport |
||
| − | |style="text-align:center;" |Intermediate |
||
| − | |style="text-align:center;" |[[File:Experienced-circle.png|center]]Expert |
||
| − | |style="text-align:center;" |[[File:Hades Platebody.png|center]] [[Hades Set]] |
||
| − | |style="text-align:center;" |20M |
||
|- |
|- |
||
| − | + | | scope="col" style="text-align:center;" style="border-bottom:1px solid white"|Coin Flip |
|
| + | | scope="col" style="text-align:center;" style="border-bottom:1px solid white"|Choose Head or Tails, whatever it lands on, the person who chose that outcome is the winner. |
||
|- |
|- |
||
| − | + | | scope="col" style="text-align:center;" style="border-bottom:1px solid white"|Roulette |
|
| + | | scope="col" style="text-align:center;" style="border-bottom:1px solid white"|The all time favourite game, Multiple bets can be placed, on 1 or multiple numbers, on a full set, ... |
||
|- |
|- |
||
| − | |style="text-align:center;" |
+ | | scope="col" style="text-align:center;" style="border-bottom:1px solid white"|Goodiebox Gambling |
| + | | scope="col" style="text-align:center;" style="border-bottom:1px solid white"|In order for this, both will need a Goodiebox of the same type, after you both have clicked the option, you open the goodiebox and the one who has the better loot gets to keep both prizes. |
||
| − | |style="text-align:center;" |[[File:Dream_Melee_Set.png|center]] [[Dream Set | Dream Melee Set]][[File:Hades_Cleaver.png|center]] [[Hades Cleaver]] |
||
| + | |- |
||
| − | |style="text-align:center;" |[[File:Dream_Mage_Set.png|center]][[Dream Mage Set]] [[File:Infinity_Gauntlet_(Charged).png|center]][[Infinity Gauntlet (Charged)]] |
||
| + | | scope="col" style="text-align:center;" style="border-bottom:1px solid white"|Boxing |
||
| − | |style="text-align:center;" |[[File:Space_Virtus_-_Set_-_Dreamscape.png|center]] [[Space Virtus Set]][[File:Infinity_Gauntlet_(Charged).png|center]][[Infinity Gauntlet (Charged)]] |
||
| − | |style="text-align:center;" |
+ | | scope="col" style="text-align:center;" style="border-bottom:1px solid white"|Box your way to freedom, Duel Arena rules. |
| + | |- |
||
| + | | scope="col" style="text-align:center;" style="border-bottom:1px solid white"|Slots |
||
| + | | scope="col" style="text-align:center;" style="border-bottom:1px solid white"|Feeling Lucky? Try out the automated Slots ! 2M or 50M bets, the choice is up to you ! |
||
|} |
|} |
||
| + | |-|Flipping= |
||
| − | '''Disclaimer''' Hourly profit is calculated based on estimated drop rates and may not depict actual hourly profit for each person |
||
| + | I'd advize you to first learn the items and their currency before attempting this, otherwise you could get broke from 1 item without even knowing it. |
||
| − | == Best in Slot Equipment == |
||
| + | </tabber> |
||
| − | Now that you have an idea of how to progress, the following table shows the current max gear for each attack style. These items are currently the best of the best in DreamScape! The following equipment was selected based on overall DPS. (This chart excludes custom items) |
||
| + | == Recommended Gear to grind for == |
||
| − | {| class="wikitable sortable jquery-tablesorter" style="border-color:red;font-size:13px;line-height:21px;width:600px;style=" cellpadding="2" cellspacing="0" text-align:center; " |
||
| + | |||
| + | {| class="wikitable dropstable mw-collapsible mw-collapsed rdtable" style="text-align:center" cellpadding="1" cellspacing="0" data-expandtext="show" data-collapsetext="hide" |
||
|- |
|- |
||
| − | ! colspan=" |
+ | ! colspan="5" style="text-align:center;" | Recommended Gear |
|- |
|- |
||
| − | ! colspan="1" style="text-align:center;" | |
+ | ! colspan="1" style="text-align:center;" |Equipment |
| + | Gear |
||
| − | ! colspan="1" style="text-align:center;" |Best In Slot Item |
||
| − | ! colspan="1" style="text-align:center;" | |
+ | ! colspan="1" style="text-align:center;" |Magic Gear |
| − | ! colspan="1" style="text-align:center;" | |
+ | ! colspan="1" style="text-align:center;" |Ranged Gear |
| − | ! colspan="1" style="text-align:center;" | |
+ | ! colspan="1" style="text-align:center;" |Melee Gear |
| − | ! colspan="1" style="text-align:center;" |Best In Slot Item |
||
|- |
|- |
||
|style="text-align:center;" | Aura |
|style="text-align:center;" | Aura |
||
| − | |style="text-align:center;" | [[File: |
+ | |style="text-align:center;" | [[File:Auras.png|30px]] [[Auras|Mystic Lvl 1-3]] |
| − | |style="text-align:center;" | |
+ | |style="text-align:center;" | [[File:Auras.png|30px]] [[Auras|Augury Lvl 1-3]] |
| − | |style="text-align:center;" | [[File: |
+ | |style="text-align:center;" | [[File:Auras.png|30px]] [[Auras|Berserker Lvl 1-3]] |
| − | |style="text-align:center;" | Aura |
||
| − | |style="text-align:center;" | [[File:InfinityAura.png|30px]] [[Infinity Aura]] |
||
|- |
|- |
||
|style="text-align:center;" | Pocket |
|style="text-align:center;" | Pocket |
||
| − | |style="text-align:center;" | |
+ | |style="text-align:center;" | |
| − | |style="text-align:center;" | Pocket |
||
| − | |style="text-align:center;" | [[File:Stone_of_Power.png|30px]] [[Stone of Power]] |
||
| − | |style="text-align:center;" | Pocket |
||
| − | |style="text-align:center;" | [[File:Stone_of_Power.png|30px]] [[Stone of Power]] |
||
|- |
|- |
||
|style="text-align:center;" | Necklace |
|style="text-align:center;" | Necklace |
||
| − | |style="text-align:center;" | [[File: |
+ | |style="text-align:center;" | [[File:Collectors_Necklace.png|30px]] [[Collector's Necklace]] |
| − | |style="text-align:center;" | Necklace |
+ | |style="text-align:center;" | [[File:Trix Amulet (i).png|30px]] [[Collector's Necklace]] |
| − | |style="text-align:center;" | [[File: |
+ | |style="text-align:center;" | [[File:Trix Amulet (i).png|30px]] [[Collector's Necklace]] |
| − | |style="text-align:center;" | Necklace |
||
| − | |style="text-align:center;" | [[File:Emperor`s_Necklace_i.png|30px]] [[Emperor`s Necklace (i)]] |
||
|- |
|- |
||
|style="text-align:center;" | Helmet |
|style="text-align:center;" | Helmet |
||
| − | |style="text-align:center;" | [[File: |
+ | |style="text-align:center;" | [[File:Trix_Helm.png|30px]] [[Trix Set|Trix Helm]] |
| − | |style="text-align:center;" | |
+ | |style="text-align:center;" | [[File:Trix_Helm.png|30px]] [[Trix Set|Trix Helm]] |
| − | |style="text-align:center;" | [[File: |
+ | |style="text-align:center;" | [[File:Trix_Helm.png|30px]] [[Trix Set|Trix Helm]] |
| − | |style="text-align:center;" | Helmet |
||
| − | |style="text-align:center;" | [[File:Skotizo_Hat.png|30px]] [[Skotizo Set | Skotizo Hat]] |
||
|- |
|- |
||
|style="text-align:center;" | Body |
|style="text-align:center;" | Body |
||
| − | |style="text-align:center;" |[[File: |
+ | |style="text-align:center;" | [[File:Trix_Platebody.png|30px]] [[Trix Set|Trix Platebody]] |
| − | |style="text-align:center;" | |
+ | |style="text-align:center;" | [[File:Trix_Platebody.png|30px]] [[Trix Set|Trix Platebody]] |
| − | |style="text-align:center;" |[[File: |
+ | |style="text-align:center;" | [[File:Trix_Platebody.png|30px]] [[Trix Set|Trix Platebody]] |
| − | |style="text-align:center;" | Body |
||
| − | |style="text-align:center;" | [[File:Skotizo_Ancestral_Body.png|30px]] [[Skotizo Set | Skotizo Body]] |
||
|- |
|- |
||
|style="text-align:center;" | Legs |
|style="text-align:center;" | Legs |
||
| − | |style="text-align:center;" | [[File: |
+ | |style="text-align:center;" | [[File:Trix_Platelegs.png|30px]] [[Trix Set|Trix Platelegs]] |
| − | |style="text-align:center;" | |
+ | |style="text-align:center;" | [[File:Trix_Platelegs.png|30px]] [[Trix Set|Trix Platelegs]] |
| − | |style="text-align:center;" |[[File: |
+ | |style="text-align:center;" | [[File:Trix_Platelegs.png|30px]] [[Trix Set|Trix Platelegs]] |
| − | |style="text-align:center;" | Legs |
||
| − | |style="text-align:center;" |[[File:Skotizo_Legs.png|30px]] [[Skotizo Set | Skotizo Legs]] |
||
|- |
|- |
||
|style="text-align:center;" | Mainhand |
|style="text-align:center;" | Mainhand |
||
| − | |style="text-align:center;" | [[File: |
+ | |style="text-align:center;" | [[File:Eternal Khione's Staff.png|30px]] [[Eternal Khione`s Staff]] |
| − | |style="text-align:center;" | |
+ | |style="text-align:center;" | [[File:AK47_Asiimov.png|30px]] [[Ak-47 Asiimov]] |
| − | |style="text-align:center;" | [[File: |
+ | |style="text-align:center;" | [[File:Royal_Sicle.png|30px]] [[Royal Sicle]] |
| − | |style="text-align:center;" | Mainhand |
||
| − | |style="text-align:center;" | [[File:Sanguinesti staff.png|30px]] [[Sanguinesti staff]] |
||
|- |
|- |
||
|style="text-align:center;" | Offhand |
|style="text-align:center;" | Offhand |
||
| − | |style="text-align:center;" |[[File: |
+ | |style="text-align:center;" | [[File:Aqua Spirit Shield.png|30px]] [[Aqua Spirit Shield]] |
| − | |style="text-align:center;" | |
+ | |style="text-align:center;" | |
| − | |style="text-align:center;" |[[File: |
+ | |style="text-align:center;" | [[File:Ice Offhand.png|30px]] [[Ice Katana]] |
| − | |style="text-align:center;" | Offhand |
||
| − | |style="text-align:center;" |[[File:Ancient Wyvern Shield.png|30px]] [[Ancient Wyvern Shield]] |
||
|- |
|- |
||
|style="text-align:center;" | Cape |
|style="text-align:center;" | Cape |
||
| − | |style="text-align:center;" | [[File: |
+ | |style="text-align:center;" | [[File:White Glass Wings.png|30px]] [[White Glass Wings]] |
| − | |style="text-align:center;" | |
+ | |style="text-align:center;" | [[File:White Glass Wings.png|30px]] [[White Glass Wings]] |
| − | |style="text-align:center;" | [[File: |
+ | |style="text-align:center;" | [[File:Blue Death Cape.png|30px]] [[Blue Deathcape]] |
| − | |style="text-align:center;" | Cape |
||
| − | |style="text-align:center;" | [[File:Tribrid_Inferno_Cape.png|30px]] [[Tribrid Inferno Cape]] |
||
|- |
|- |
||
|style="text-align:center;" | Arrow |
|style="text-align:center;" | Arrow |
||
| − | |style="text-align:center;" | |
+ | |style="text-align:center;" | |
| − | |style="text-align:center;" | Arrow |
||
| − | |style="text-align:center;" | [[File:The Power Fist.png|30px]] [[The Power Fist]] |
||
| − | |style="text-align:center;" | Arrow |
||
| − | |style="text-align:center;" | [[File:Thepowerstone.png|30px]] [[The Power Stone]] |
||
|- |
|- |
||
|style="text-align:center;" | Boots |
|style="text-align:center;" | Boots |
||
| − | |style="text-align:center;" | [[File: |
+ | |style="text-align:center;" | [[File:Seers_Boots.png|30px]] [[Seers Boots]] |
| − | |style="text-align:center;" | Boots |
+ | |style="text-align:center;" | [[File:Archer Boots.png|30px]] [[Archer Boots]] |
| − | |style="text-align:center;" | [[File: |
+ | |style="text-align:center;" | [[File:Berserker_Boots.png|30px]] [[Berserker Boots]] |
| + | |||
| − | |style="text-align:center;" | Boots |
||
| − | |style="text-align:center;" | [[File:Ultimate_Tribrid_Boots.png|30px]] [[Ultimate Tribrid Boots]] |
||
|- |
|- |
||
|style="text-align:center;" | Gloves |
|style="text-align:center;" | Gloves |
||
| − | |style="text-align:center;" | [[File: |
+ | |style="text-align:center;" | [[File:American_boxing_gloves.png|30px]] [[American Boxing Gloves]] |
| − | |style="text-align:center;" | Gloves |
+ | |style="text-align:center;" | [[File:American_boxing_gloves.png|30px]] [[American Boxing Gloves]] |
| − | |style="text-align:center;" | [[File: |
+ | |style="text-align:center;" | [[File:American_boxing_gloves.png|30px]] [[American Boxing Gloves]] |
| − | |style="text-align:center;" | Gloves |
||
| − | |style="text-align:center;" | [[File:Ferocious Gloves.png|30px]] [[Ferocious Gloves]] |
||
|- |
|- |
||
|style="text-align:center;" | Ring |
|style="text-align:center;" | Ring |
||
| − | |style="text-align:center;" | [[File: |
+ | |style="text-align:center;" | [[File:Avery's_Ring.png|30px]][[Avery's Ring]] |
| − | |style="text-align:center;" | Ring |
+ | |style="text-align:center;" | [[File:Avery's_Ring.png|30px]][[Avery's Ring]] |
| − | |style="text-align:center;" | [[File: |
+ | |style="text-align:center;" | [[File:Avery's_Ring.png|30px]][[Avery's Ring]] |
| − | |style="text-align:center;" | Ring |
||
| − | |style="text-align:center;" | [[File:Emperor`s_Ring_i.png|30px]] [[Emperor`s Ring (i)]] |
||
|} |
|} |
||
</center> |
</center> |
||
Revision as of 15:30, 27 July 2021
![]()
Welcome to Redemption! Redemption is a Custom 317 private server! Our developers and staff work to bring in custom NPCs, Armour, Weapons, and Items to make our server a unique experience! This short guide aims to familiarize you with some of our items and equipment, how to get them, and how to progress to the next stage! The guide acts as a loose guide to direct you from starting to end game!
Choosing Your Gamemode
Upon joining Redemption for the very first time, you are summoned to choose your gamemode. Redemption offers 3 unique playstyles that will differentiate your experience. Choose wisely as all choices are final for that account!
| Type of gamemode | Experience | Additional Stats | |
|---|---|---|---|
| Normal | Fast skilling and combat experience | No extra Benefit | |
| Hardcore | Slow skilling and combat experience | +20% Drop Rate and 5% Double Drop Rate Bonus You can remove your hardcore status ::removehardcore (This is irreversible) | |
| Slow skilling and combat experience | +30% Drop Rate, 25% Luck and 5% Double Drop Rate Bonus You can't trade or use Player Owned Shops. You cant remove Ironman status | ||
Membership Ranks
| Redemption offers 4 different membership ranks who can really help you getting started. All Membership Ranks can be purchased Here. | |
|---|---|
| Can be purchased through the store for $15. | |
| Can be purchased through the store for $35. | |
| Can be purchased through the store for $50. | |
| Can be purchased through the store for $100. | |
In-Game Tabs
| Tab | Picture of the Tab | Description | |
|---|---|---|---|
| Combat Styles |  |
You can see the weapon you're currently wielding, your combat level, which attack style you're currently using and whether you're auto reatilating or not. (Advised to keep this on) | |
| Skills | 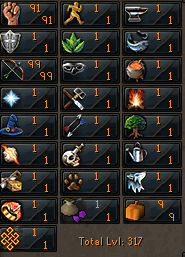 |
Skills as you know them, the only difference is that there are 3 CUSTOM skills ! Karma, Scavenger and Gambling. Check out the pages to know more about each skill ! | |
| Player Panel |  |
One important Tab. This tells the current active player count, your total of referrals which boosts you currently have (Luck/Drop Rate/Double Drop Rate) which Daily Event is currently happening. ALSO there are 8 other screenshots following further explained ***HERE*** (add quick link - Diamond Bag) | |
| Inventory |  |
Showcases your current inventory | |
| Equipment Tab |  |
Showcases what you're currently wearing. Clicking the Headpiece and Shield left below will show you how you look for the other players + current bonuses (Attack/Defence/Others). The crossed swords will show you your cosmetics (often if you misclick an item and its gone, you'll find it here) - Any gear can be worn as cosmetic, just not mainhand weapon. | |
| Prayer List | 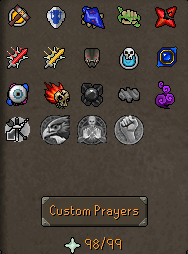 |
Redemption has 3 Different Prayer lists, the two common are; Normal Prayers & Lunar The 3rd one however is filled with custom perks. Full detailed list about perks you'll find here . | |
| Magic Spellbook |  |
Here you can choose different teleports; Home - Monster - Minigame - Boss - Pking - Skilling - City - Edgeville. Further explained ***HERE*** (add quick link - Diamond Bag) | |
| Clan Chat |  |
You can switch Clan Chat Channels here; "Help" cc is the most common used if you are having questions or are unsure about certain things "Event" is the cc you'd need if you're participating in events "Dice" is the cc you require to be able to gamble. | |
| Friends List |  |
Friends you come across Redemption, also players you'd like to ignore | |
| Staff List | 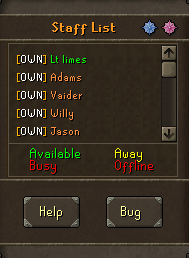 |
Another important one to keep an eye out ! You'll find the FULL staff list here, which of the staff are online The "Help" button (When in need of help, press this and you'll be helped as soon as possible) The "Bug" button (if you come across a bug, feel free to add in a full explanation on how it happened, Gyazo Links work in here !) | |
| Quick Links | 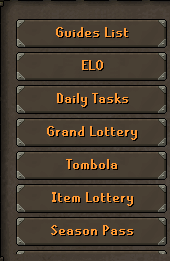 |
Very useful tab ! Most important ones are "Guides List" - "ELO" as they will give you a fair share of information. "Guides List" will include Clue scrolls, Arcade, Gear, Pets, ... | |
| Options | 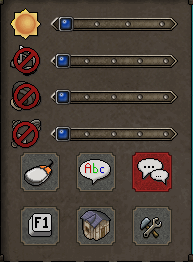 |
"Toggle Mouse Button" - clicking on Npcs will give you the rightclick option, but as a leftclick "ABC" - Your personal Yelltag, yellcolor, yellshadow (Need to be Regular Donator) "Split-level-Chat" - Private messages toggle above your chatbox. "Keybinding" - Set the tabs on a special key. "More Options" - Playing on Fixed (1/4th of the screen) - Resizeable (any size to your liking) - Fullscreen (full screened) | |
| Emotes |  |
Your daily dose of emotes (useful for clue scrolls) | |
Shops
| Shop Name | Short Description |
|---|---|
| Sarah's General | General items, going from potions to weaponry. |
| Durka Durka | Tools used for skilling mostly & food. |
| Elissa's Magic Store | Magic items (Gear & Runes). |
| Vote Shop | Gear & Weaponry can be bought with Vote Tickets. |
| Loyalty Shop | Rare Items, Titles and Pets can be bought here. Currency; Loyalty Points. |
| Prestige Shop | Not worth mentioning atm. |
| Skillcape Shop | Not worth mentioning atm. |
| Achievement Shop | With Achievement points, you can buy boxes / upgrades for a special cape. |
| Raid Rewards Shop | Ultra Rare Drops from Raids can be bought here by spending Raid Points (points per kill at raids). |
| The Arcade Shop Master | Diversity of items, useful and cosmetic - also part of medium moneymaker. |
| Wilderness Shop | Starter Items and Boxes can be found here, with spending ::pkp (Pkpoints). |
| King Percival | Tells you random info, doesn't sell items. |
| Donator Shop | Sells a diversity of items who are also found in the ::store - Bonds would be needed to buy things here. |
| Roachey | Diversity of items, mostly cosmetic ones which can be bought with Donator Points (which you receive for each donation). |
| Black Market Dealer | Selling very very useful starter stuff you definitely need ! Worth your while to check it out. |
| Milestone | Right Clicking him will grant you a cape when you reach all skills 10-20-30-... |
| Iron Man | If you're an Ironman and claimed a Donator scroll, you'd lose your "Iron Man" title, talking to him will revert this. (you still hold the rank though) |
| Referral Shop | If a friend of you joins and refers to you, you get a point. You could buy good items from this shop then with those refers. (Abuse will be noticed) |
| Pet Point Shop | All different kinds of pets can be bought here, with ultra pet Points (when opening Ultra Pet Boxes, you get 1 point). |
| Clue Scroll Shop | Items needed for solving Clue Scrolls, can be found here. (Barrows Gloves not, as they are obtained on another way.) |
| Box Set Maker | Diversity of boxes can be found here, if you have loose pieces - this man will attach them together to save up inventory space. |
Moneymakers
| Moneymaker | How to get the money | More in-depth guide Here. |
|---|---|---|
| Slayer Task (Easy) | Easy Slayer tasks are super easy and can very beneficial when it comes to making money. | |
| Clue Scrolls (Easy) | Easy Slayer tasks are super easy and can very beneficial when it comes to making money. | |
| Revenants | Quick money making in the wilderness cave. You will note lose your items if you die. |
| Moneymaker | How to get the money |
|---|---|
| Abyssal Sire | Abyssal Sire is a boss requiring you to kill 4 respirator systems but can drop great loot. |
| Clue Scrolls (Hard) | Hard Clue Scrolls has a chance to be dropped from any types of monsters throughout the server. |
| DC Arcade | A quick minigame of 5 different waves of your favourite heroes. |
| Dreamland | A long minigame with 100 waves but greatly worth it upon completion. |
| Slayer (Hard Task) | Hard tasks cost 25 slayer points and requires a Mid-Game gear setup. |
| Skotizo | Skotizo is a good way of making some quick money if you are lucky. To kill Skotizo you'll need to kill the werewolves outside for the Skotizo Key. |
| Vorkath | Vorkath is a boss requiring constant movement to avoid dying. |
| Theatre of Blood | Same as the Nightmare, only difference is; This raid can only be done with a party of max |
| Strykewyrm Minigame (Normal) | Strykewyrm Minigame is a challenging raid which cost 50.000 to start but can be worth it upon completion. |
| Moneymaker | How to get the money |
|---|---|
| Yu-Gi-Oh Raid | A raid with 3 different difficulties and 5 waves of VERY hard bosses. |
| DC Universe | A quick minigame of 5 different waves of your favourite heroes. |
| Slayer (Boss Task) | Boss tasks cost 2500 slayer points and is VERY hard. |
| Dreamland | A long minigame with 100 waves but greatly worth it upon completion. |
| Alchemical Hydra | Requiring the Alchemical Hydra to be moved into the different pools upon losing health and changing colors. |
| Vorkath | Vorkath is a boss requiring constant movement to avoid dying. |
| Chamber of Xeric | A hard mechanical raid requiring melee, ranged and mage weapons to complete. |
| Strykewyrm Minigame (Hard) | Strykewyrm Minigame is a hard minigame requiring the Lava Strykewyrm Set in your inventory. |
| Clue Scrolls (Elite) | Elite Clue Scrolls has a chance to be dropped from any types of monsters throughout the server and HIGHLY beneficial. |
Teleport Interface

What are the different features of the Teleport Interface?
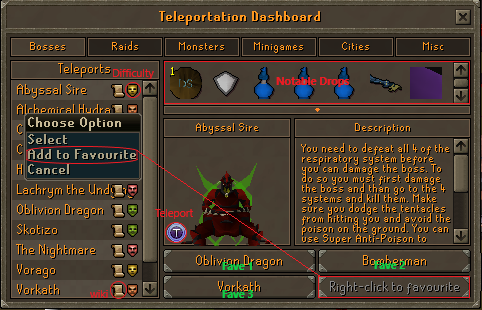
Above you can see all the types of teleports, Bosses - Raids - ..., clicking one of those will provide you further info about that section.
Then, you have the teleports shown in that section; Bosses ->Abbysal Sire, Alchemical Hydra...
Inside this list, there are 2 features, either an instant link towards it's Wiki Page, or it's difficulty (Green = Easy, Yellow = Medium, Red = Hard).
Another option is to include one of the teleports towards your "favourites", which means the following. Instead of heading over to the teleport you'd like to use, you just click on it in the bottom right corner of the screen and you will be teleported there straight away (Max 3 Favourites).
But that's not all the Teleport Interface has to offer! You can also see which items the Bosses /Raids Drop and a small description about them. When you click on the little arrow right below the shown items, the full droptable will be shown !
These are all the bosses you can easily teleport towards.
Here are all the possible raids you can enter.
Here are all the possible monsters you can kill.
Here you will find the different minigames Redemption has to offer.
- Barrows
- Dice Zone
- Event Zone
- Dreamland
- Pest Control
A diversity of cities you can teleport towards.
- Al Kharid
- Ardougne
- Burthorpe
- Canifis
- Catherby
- Draynor Village
- Falador
- Lumbridge
- Port Sarim
- Seers' Village
- Varrock
- Yanille
Last but not least, all the different zones you can use to your liking.
- Shops
- Upgrades
- Marketplace
- Slayer Tower
- Cartoon Tower
- Drop Party Room
- Soul Room
- Uncle PennyBags
- Scrooge McDuck
- Sponsor Zone
- Executive Zone
- Platinum Zone
- Bomberman
- Miss Fortune
- Mr X
Useful In-Game Commands
| Teleports | |||||||||
|---|---|---|---|---|---|---|---|---|---|
| Teleport Command | Information / Use | ||||||||
| ::forums | Gets you directed straight to the forums, where giveaways take place occasionally. | ||||||||
| ::wiki | Gets you directed straight to the wiki, where all your necesary information is. | ||||||||
| ::discord | Gets you directed straight to the discord, where events happen on a daily base and occasionally a giveaway. | ||||||||
| ::bank | Gives you access to your own bank anywhere within Redemption. (Need to be Super Donator+) | ||||||||
| ::event | Daily hosted events by our Event Managers, free loot! | ||||||||
| ::shops | Access to where most of the shops are aligned. | ||||||||
| ::dp | Teleports you to the Dropparty Room (Every $750) donated, automatically drops a variety of decent items. | ||||||||
| ::soulroom | When you have obtained souls from killing Npc's, or if you want to open your Crystal Keys. | ||||||||
| ::vote | Free loot when you have voted, because why not! | ||||||||
| ::voteboss | After voting you can access this Vote boss for free ! Top 25 hitters get loot. | ||||||||
| ::upgrade | Certain items can be upgraded, check out the full list at Upgrades. | ||||||||
What you should aim for
Within Redemption, your account can go many different ways. It all depends on what you're looking for in the game.
What you'd need to focus on within Pvming, would be ofcourse getting a decent Gear Set-up which can be upgraded within a few weeks / months purely by grinding.
With Pvming there are 2 main perks you need to focus on, Damage and Drop Rate.
The Damage is self explanatory, you'd need it so you can kill the Npc's much quicker instead of having to stare 5 minutes at your screen per kill.
Drop Rate however is another recommended perk.
Drop Rate itself is basically reducing your amount of kills required in order to get a drop. There is a variety of items which can give you a huge boost in this perk.
After these 2 main perks, Redemption has 2 other perks to offer aswell; Luck and Double Drop Rate.
Luck itself can get you more perks aswell.
- Opening boxes (e.g. mystery boxes and all donation boxes)
- Soul room keys ultra rare drops
- Raids - rare/ultra rare rewards
- Birds nests/eagles nests - rare rewards (e.g. row i)
- Clue Scrolls
You can get up to a maximum of 100% Luck.
Then there is Double Drop Rate. In case you would be lucky enough to get a drop from an Npc, getting your Double Drop Rate up could get you a possible Double Drop. When you have progressed further in the game, this is very useful considering you can get insane drops and having these not doubled, would be painful to see.
If you're looking to get rich or die trying, below you will find the different kind of Gambles Redemption has to offer for you.
Make sure when you are making a bet or accepting one, you DOUBLECHECK the other players bet.
| Gambling | |||||||||
|---|---|---|---|---|---|---|---|---|---|
| Gamble Name | Information / Use | ||||||||
| Dice Duel | Duel Ft (First to) 1 - 3 - 5: Place your bet, choose the number you want to get Ft'd for, check the bet again and gamble away. Who ever gets First to 1/3/5 wins the pot. Rolls from 0 -> 100. | ||||||||
| Flower Poker | Try getting lucky with the automated Flower Poker system. Bust < 1 Pair < 2 Pair < 3 of a Kind < Full House < 4 of a Kind < 5 of a Kind. | ||||||||
| Npc Duel | Accept the terms and let Redemptions' NPC's fight it out for you ! Godzilla or Donkey Kong, who will win!? | ||||||||
| Coin Flip | Choose Head or Tails, whatever it lands on, the person who chose that outcome is the winner. | ||||||||
| Roulette | The all time favourite game, Multiple bets can be placed, on 1 or multiple numbers, on a full set, ... | ||||||||
| Goodiebox Gambling | In order for this, both will need a Goodiebox of the same type, after you both have clicked the option, you open the goodiebox and the one who has the better loot gets to keep both prizes. | ||||||||
| Boxing | Box your way to freedom, Duel Arena rules. | ||||||||
| Slots | Feeling Lucky? Try out the automated Slots ! 2M or 50M bets, the choice is up to you ! | ||||||||
I'd advize you to first learn the items and their currency before attempting this, otherwise you could get broke from 1 item without even knowing it.
Recommended Gear to grind for
| Recommended Gear | ||||
|---|---|---|---|---|
| Equipment
Gear |
Magic Gear | Ranged Gear | Melee Gear | |
| Aura | ||||
| Necklace | ||||
| Helmet | ||||
| Body | ||||
| Legs | ||||
| Mainhand | ||||
| Offhand | ||||
| Cape | ||||
| Arrow | ||||
| Boots | ||||
| Gloves | ||||
| Ring | ||||